Customer Contacts


Some helpful tips for properly managing your customer contacts in Acctivate. Contact management is included in Acctivate’s Customer Relationship Management (CRM) functionality.
Multiple customer contacts can be stored for each customer in Acctivate. Having contacts in one database eliminates the hassle of re-keying them when they are needed throughout the system and allows access to all users within your organization.
Once you have established contacts in the Customer window their information will appear in several other windows, such as Business Activities, Sales Order and Sales Quote windows associated to that customer. Each of these windows will display the main contact’s name, phone number, fax number and email address by default. If a user selects a ship to location with specific contact info, the sales order will default to said information. Users can also toggle the contact information displayed in each window.
Sequencing Priority of Contact Information for Sales Documents
When creating a Sales Order for a Customer, the Customer contact information can be populated on the Sales Order from three different locations on the Customer Information window. This is the order in which these fields are populated.
- Ship To Contact: Enter contact information on the Edit Customer window > ShipTo tab. When ship to specific contact details exist, this is the Contact information on the Sales Order that is displayed by default.
- Customer Contact: Enter main contact information the Edit Customer window > Customer > Phone tab along left hand side of window. If no ship to specific contact information exists, this is the contact information shown on sales documents. To use this on a sales document, toggle the Contact drop down and select the Customer Name.
- Additional Contacts: These can be selected manually and pull from the Edit Customer window > Contacts tab or typed directly into the Contact box on the sales document.
Managing Customer Contacts
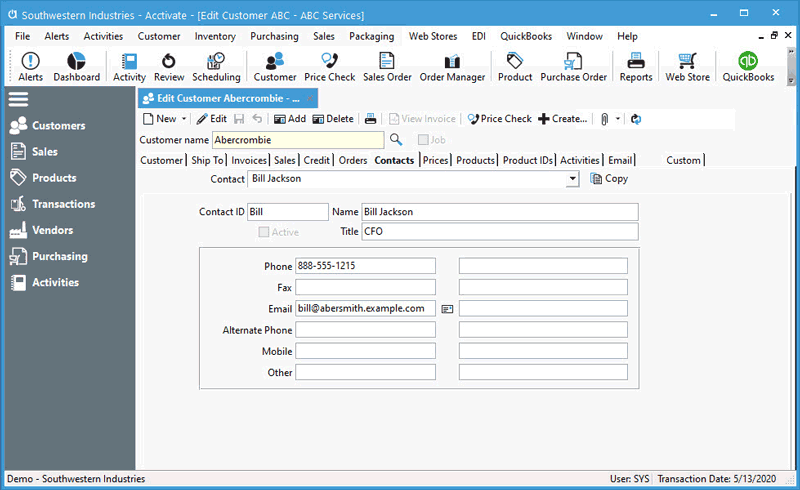
In Acctivate, contacts for every customer can be entered in the Edit Customer window > Contacts tab. Contacts can include information such as a person’s name, title, phone number and email address among others. There is no limit to the number of contacts you can add to each customer.
Users can click Add to create a new Contact, Edit to modify the current contact displayed, or Delete to remove a contact. The sections below cover adding, modifying, and deleting customer contacts.

Adding New Customer Contacts
- Open the Edit Customer window and select the customer in question.
Make sure you are not in Edit mode when adding additional contacts. - Select the Contacts tab.
- Click the Add button from the Customer window toolbar.
- Assign the new contact a Contact ID. This is a required field and must contain a different ID for each contact within a customer record.
- In the Name field, type the name of the contact.
- In the Title field, type the job title of the contact (not required).
- Enter all relevant contact information in the Phone, Fax, Email, Alternative Phone, Mobile, and Other The fields adjacent to the contact information can be used to describe what the value means or notes (i.e., personal email).
- Click the Save button.
- The new contact you just made will appear in the Contact field drop-down list.
Modifying Customer Contacts
- Open the Edit Customer window and select customer in question.
- Select the Contacts tab.
- Choose the contact to delete from the Contact drop down.
- Click Edit.
- Update necessary fields (i.e., mark contact as inactive by unchecking Active box under Contact ID).
- Save
Removing Customer Contacts
- Open the Edit Customer window and select customer in question.
- Select the Contacts tab.
- Choose the contact to delete from the Contact drop down.
- Click Delete button on customer window toolbar.
- Choose Yes to delete contact in following prompt.


