Create Customer Jobs


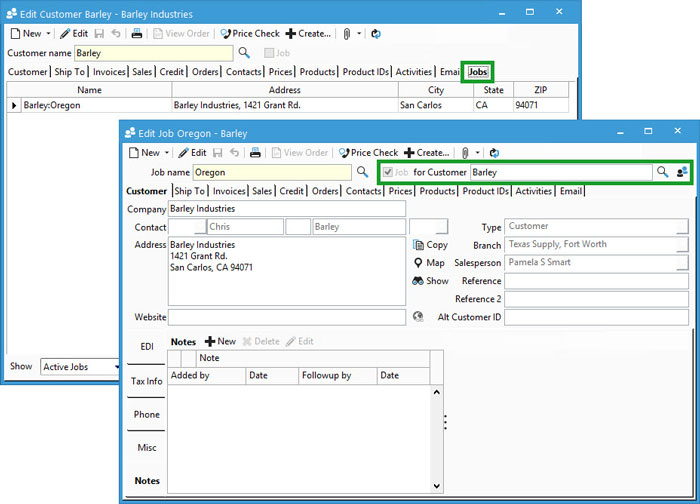
In Acctivate, users can create customer jobs via the Edit Customer window or link an existing customer. Each job is considered an individual customer which means billing is per job.
Any jobs created in QuickBooks will synchronize to Acctivate as such for use in the sales process. For consolidated billing or statements, print from QuickBooks. Individual job invoices are printed from Acctivate.
When utilizing the customer import utility, the parent is required to be in the system before creating and assigning jobs to it. For further details, check out this training page.
Create New Customer Job
- Select Customer > Customer Information on the title menu to open the edit customer window or click Customer icon on the icon bar.
- Click the drop-down arrow next to the New button in the window.

- Select New Job from the drop-down menu.
- This checks the Job box and opens the Choose Customer window to select the parent customer from the list.
- Select the customer the job is for. This customer will populate the Customer field on the top-right.
- Enter the Job name which will be the customer ID or customer name in Acctivate and QuickBooks.
- Update any of the prefilled customer information based on the parent customer selection in step 5.
- When ready, click the Save button.
Link Existing Customer to Parent Customer
- Navigate to the customer needing to be linked to the parent.
- Click Edit, if not opened from customer list.
- Check the Job box next to the magnifying glass button.
- The Choose Customer window opens for the user to select the parent from a list.
- Acctivate prompts the user to update the contact information to match the newly assigned parent customer. Choose Yes or No depending on need.
- Save changes.
All parent customers linked to jobs will have a Jobs tab within the Customer Information window. Users can double-click on these records to open from the parent customer, when needed, by double-clicking the job name. The parent customer can also be accessed from a job by clicking the View Customer button at the top-right next to the Customer field.


