Use Business Activities to Relate Multiple Documents and Transactions


The Business Activity window provides users with the ability to be proactive in the management and functionality of operations. It is designed to keep track of special information related to customers, products, sales, purchases, vendors, and transactions.
Being our most customizable feature, Business Activities have an endless number of use cases. Using the different Types setup in Configuration Management, you can segment different functions like sales opportunities, return merchandise authorizations (RMAs), project management, etc.
This page covers the basics of creating and using a business activity. Check out this page for information on adding time and/or materials for service billing purposes.
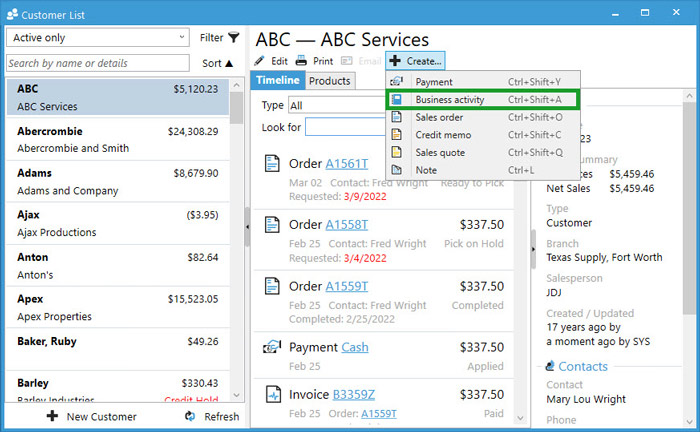
Due to the nature of business activities, users can create one from most windows within Acctivate wherever you see the + Create or New Activity button. Creating them from any window outside of a new blank business activity, will automatically relate whatever the record is to the new activity. Below is a list of options on creating a new activity:
- Activities list on left navigation menu > + New Business Activity at the bottom of the list window.
- Select an existing Activity from the list to + Create > Related business activity.
- Activities menu > Enter Business Activities.
- Click New to create a new activity or lookup an existing activity to + Create > Related business activity.
- Most list windows from the left navigation allow users to + Create > Related business activity. This includes Customers, Products, and Vendors. Select the record in question to see the create menu appear.
- The same functionality is on the Edit windows for customers, products, sales orders, purchase orders, and inventory transactions prior to posting. Users will utilize the + Create menu or New Activity button to create a related business activity for the specific window.

Edit Details of Business Activities
After clicking New, Edit, or Create from another window, the Business Activity window will open for the user to begin selecting and entering details related to the new activity.
- Select the Type for your specific scenario. For this example, we’re going to setup a return merchandise authorization (RMA) as the type. This selection gives the user specific options for the other fields on screen based on what’s marked as included on the configuration of the specific type selected.
- The remaining header fields, including the assigned to user, code, resolution, status, and priority default based on the settings for the selected type. Toggle these selections, if needed. Typically, the default values cover what’s required when creating a new activity of the type selected.
- On the Discussion tab, enter the Description of the RMA. This is a brief description of what needs to occur for the specific activity.
- Add important details to expand on the description in the Discussion field.
- Depending on where the BA was created, you may see a related item already selected. This occurs when you’ve utilized the + Create option from windows in Acctivate. Feel free to add other related items to the list, as needed.
Other Considerations when filling in Business Activities
- Opened, Due, Promised, and Appointment Dates: These can be utilized to filter and prioritize the activities in the Business Activity Review window.
- Notes: Create notes with files attached or use as reminders for a user to complete tasks for the activity.
- Email: If the customer emailed you information needing to be added to the BA, drag and drop it from Outlook into the Email tab. This tab also shows users what emails were sent from the activity within Acctivate.
- Time: Add labor items to track time spent or bill the customer via service billing.
- Materials: Add products used for the activity when needing to bill for materials.
- Log: Based on settings in the Activity Options section of Configuration Management, you’ll see changes to the BA for specific field updates.
- Resolution: Fill this in when the activity is completed to notate what was done to resolve any issues or special notes about the project.
Relate Documents and Transactions to Business Activities
- Navigate to the Business Activity in question by creating it from one of the options above or selecting from the list and clicking Edit.
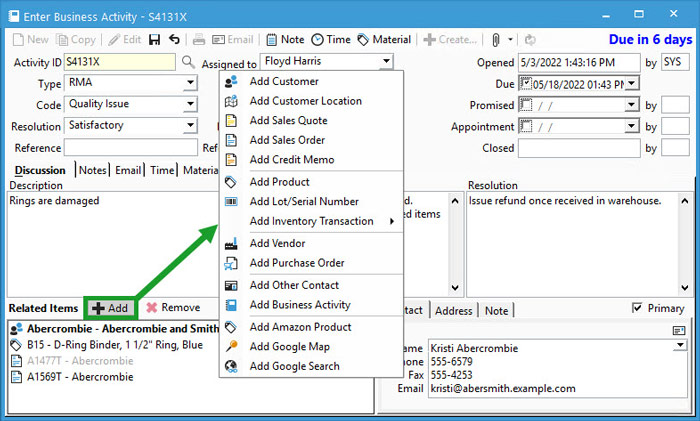
- In the Related Items section, click + Add to see the full list of options.
- Select the appropriate option depending on need. For the example below, we’re using the BA to track a RMA. We’ll link a customer, original sales order, and the item being returned.
- Add Customer > search for and find the customer in question > Select. If BA created from the customer window, this will already be related.
- Add Sales Order > search for and find the sales order > Select.
- Add Product > search for and select the product.
- Save changes.

Remove Related Items from Business Activities
- Navigate to the Business Activity in question by creating it from one of the options above or selecting from the list and clicking Edit.
- In the Related Items section, select the item needing to be removed.
- Click Remove button.
- Repeat steps 2 and 3 for all unnecessary related items.
- Save changes.


