Reorder Inventory Based on Demand

Full training library
One extraordinarily useful tool in Acctivate is the Reorder button in the Inventory Manager utility. This window allows you to see all the products which meet the criteria of needing to be reordered (reorder inventory formula) and quickly create Purchase Orders to send to your vendor(s).

- To reorder inventory, open Inventory Manager clicking the button on the icon bar or Inventory > Inventory Manager.
- Depending on the default View, toggle to the Restocking button bar by clicking View > Restocking.
- Select the Reorder button.
- When viewing the products that you need to reorder inventory for, there are various options that can enabled to help you better review the data.
- Find Panel: Search results quickly based on specific text. To open, click View > Find panel or use the shortcut CTRL + F.
- Grouping Panel: Open a space to drag and drop column headers to group data in the grid below. Acctivate supports multiple levels of groupings. This is opened by using similar steps as above – View > Grouping panel or CTRL + G.
- Sorting: Select a column header to toggle between ascending, descending, and no sort. Multi-column sorting can be done by holding shift while clicking on other column headers.
- Filter: Press the Filter button to add additional criteria to the currently saved filters. This will not update the filters for the button for future reorders. Clear by clicking the X next to the Filter button.
- Check by ID: Select rows in the grid based on a specific product ID using the lookup or by scanning a product barcode with a USB scanner. Repeat as many times as needed to continue checking rows.
- Check off all or specific rows to choose which items you wish to create PO’s for.
- Once all necessary products/groups selected, select Action > Create Reorders.
- A confirmation message appears with the total count of products selected. Choose Yes to continue to the Create Reorders window:
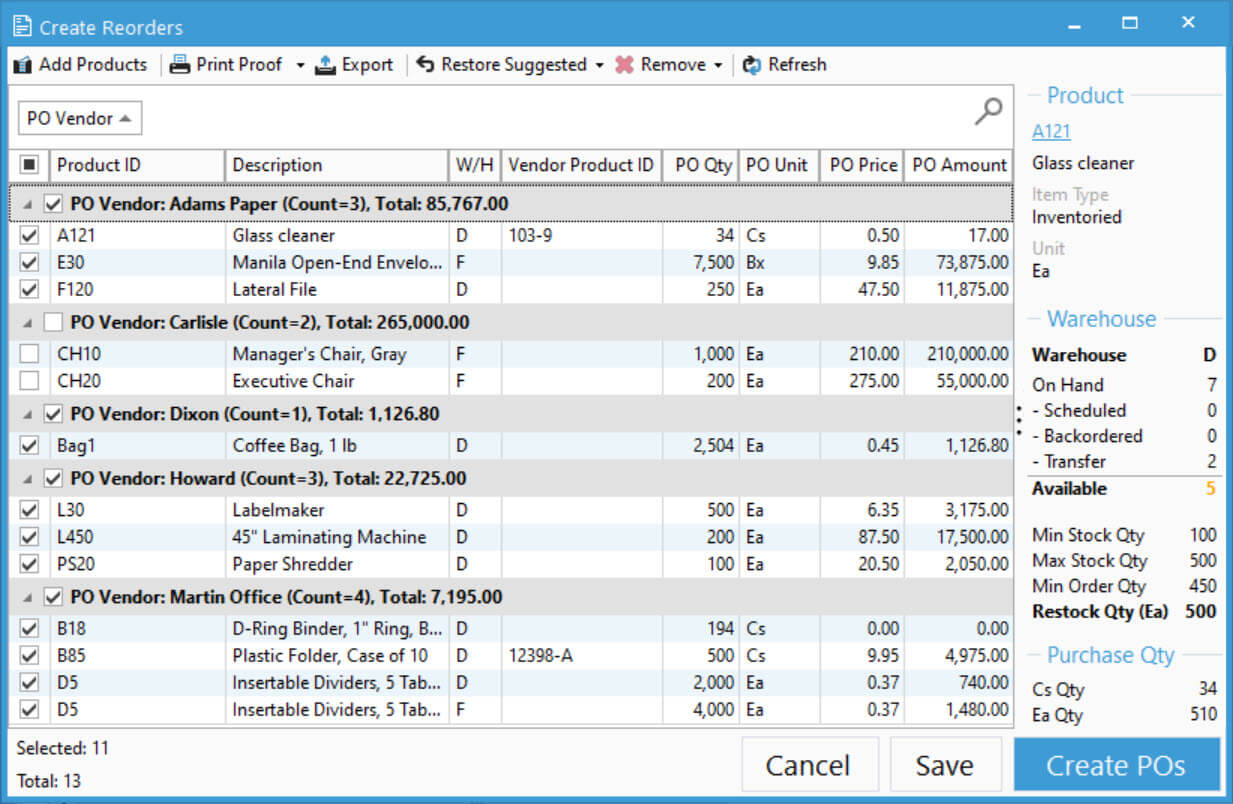
- The following Actions are available:
- Add Products: Return to Inventory Manager to add more items to reorder window.
- Print Proof: You can select the Inventory Reorder Proof or the Inventory Reorder Proof by Supplier by clicking the drop down next to the Print Proof button.
- Export: Send the results on screen to a csv. This includes all values you see on screen plus additional information from the product warehouse records.
- Restore Suggested: Revert changes for all, all selected, or unselected rows in the grid below.
- Remove: Delete all, all selected, or unselected rows from the reorders window.
- Refresh: Verify any changes made by other users or additional products added.
- Check off all or each row you wish to reorder. Once all vendors are selected on any blank rows, group by this column by dragging it to the grouping panel above the grid. The same can be done by dragging any other column to the grouping panel (i.e., warehouse). When grouping, you’ll see totals per group.
- Update any of the prefilled fields based on need:
- Supplier Name: Defaults to Preferred Supplier, but you can choose from a menu of suppliers associated with this product or assign a new one by using the lookup.
- PO Qty: Defaults to the Suggested Order Qty. This can be changed prior to creating the PO’s. The panel on the right shows the calculation on how Acctivate found the suggested quantity.
- PO Unit: Defaults to the Vendor’s purchase unit if defined, or the default purchase unit for the product and can be updated.
- PO Price: The price defaults to the set price of the product vendor record or the last saved PO price for the same combination.
- PO Amount: Update the line amount to recalculate the price.
- Click Save when data is verified and you’re ready to move forward.
- Choose Create POs to generate a PO for each product vendor and/or warehouse selected.
- Acctivate will prompt you if you want to continue creating the total number of POs being created. This includes a warning for any rows listed with $0 price.
- Click Yes from the prompt that appears and OK from prompt afterwards.
Note: PO’s created from the Create Reorders window are considered to have been reviewed and approved, therefore they will go straight to an Issued status, regardless of any default PO statuses configured.

