Special Orders


With the use of S lines on Sales Orders, users have the option create special orders from your vendors to receive into stock. These lines will automatically schedule once the special order is received into the warehouse.
This includes assignment of any lot or serial numbers created on the receipt session. Products which are always special ordered can utilize the Special Order Only item type or the user can toggle the line type on the sales orders to be S when the need arises for any product.
Once the sales order is created and saved, the special order PO(s) can be created from 3 different spots depending on need:
- Purchasing menu
- Sales List on left navigation bar
- Enter Sales Order window
Initiating the Special Order PO can be done for a specific order or as a bulk action. The first two sections below cover how to get to the Special Order Wizard from the Sales List and the Enter Sales Order window. Once there, the steps are the same as if you’ve opened the wizard directly. When doing this as a bulk action, orders shipping to the same warehouse from the same vendor can be combined into one purchase order.
Special Order Ship Purchase Orders from Sales List
- Select the Sales list.
- Type the Order Number in the Search for box or find and select the order in question from the list.
- + Create > Special Order PO
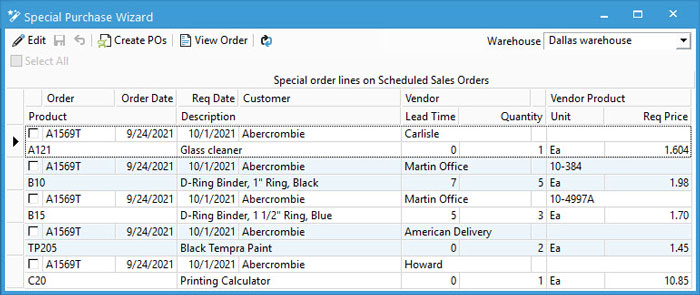
- Special Order Wizard opens for processing S lines listed on order by warehouse.
Special Order PO from Enter Sales Orders Window
- Navigate to Sales > Enter Sales Orders.
- Type the order number and press tab or search for and select from the look up.
- Click Create Vendor PO(s) button or use Action menu > Create Vendor PO(s).
- Special Order Wizard opens with the order details from the specific order by warehouse.
Special Order Wizard
If opening from a specific order, each S line listed on the order will already be checked when the wizard opens. Whenever the need occurs to create multiple special order purchase orders at one time, users have the ability to do so by going directly to the Special Order Wizard. Based on the selected warehouse, the wizard displays all order detail lines marked with a line type of S which do not have a purchase order created in the database.

- Navigate to the Purchasing menu > Special Order Wizard.
- Choose the proper Warehouse.
- Click Edit.
- Add any missing information to each line. The full field list is here, but the most common updates are done in the following:
- Vendor: This will default to the Preferred Vendor on the product. If no preferred vendor exists, users can choose from the vendors assigned to the item via the drop-down menu in the field. When no vendors assigned to the product, click the browse button to search for and select proper record.
- Vendor Product: Verify, select, or add a vendor product ID when necessary.
- Req Price: This is the requested purchase price. If the vendor has purchasing history or a set price, this will default to a specific price.
- Select the orders needing to have a Special Order PO created or check the Select All box at the top.
- Save selections and modifications to vendor info.
- Click Create POs.
- A message will appear with the total number of PO’s created. Click OK.


