QuickBooks Inventory Management Software | Acctivate

QuickBooks Inventory Management Software

  • Home
  • Solutions
  • Explore
  • Support
  • Contact
  • Free Trial
  • Onboarding
  • Training
  • Downloads
  • Documentation
  • Knowledge Base
 

Inventory Adjustment

An Inventory Adjustment allows the user to adjust their inventory up or down by a specific number. If you find a single damaged unit and wish to remove it from inventory, you post an inventory adjustment for -1 to remove one from inventory.
IN THIS ARTICLE
 •  Review Inventory Adjustments
 •  Create/Post Inventory Adjustment

If you need to adjust your inventory up because you found 2 of an item that you did not know you had, you post an inventory adjustment for a positive 2 and that will increase your on hand quantity by 2. When needing to adjust another transaction type like an inventory receipt, make sure to use the same transaction type to correct or use the void inventory session function and recreate it properly.

Review Inventory Adjustments

  1. Choose the Transactions list from the left navigation bar.
  2. Search for and locate the session or transaction types in question.
  3. Select session for review.
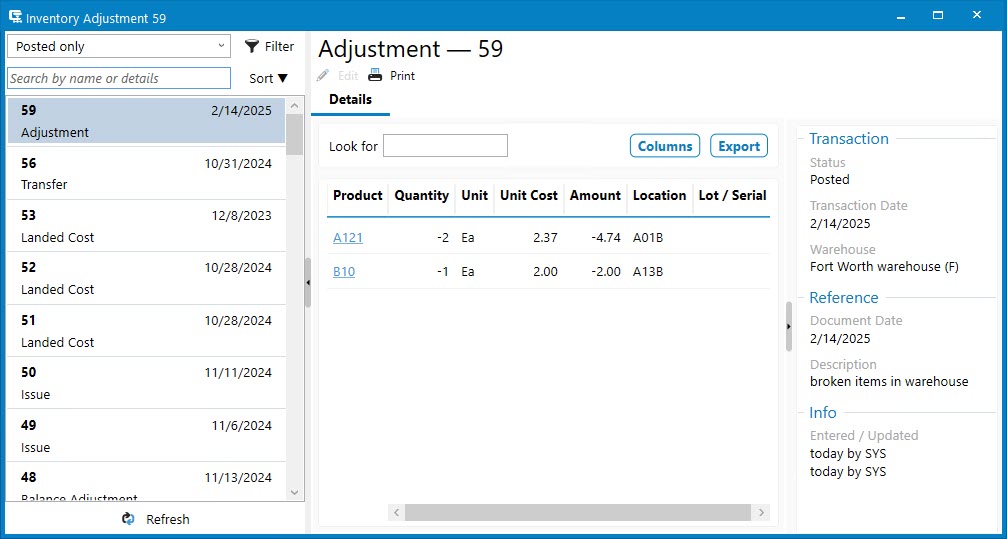
  4. Sessions saved, but not posted will show Draft on the list, as well as a watermark on the read only window for the transaction. These can be modified before posting by clicking the Edit button.
  5. Posted sessions will show more information, such as unit cost and amount adjusted.

Inventory Adjustment Window

Create and Post an Inventory Adjustment

  1. To open the window, go to Inventory > Inventory Adjustment.
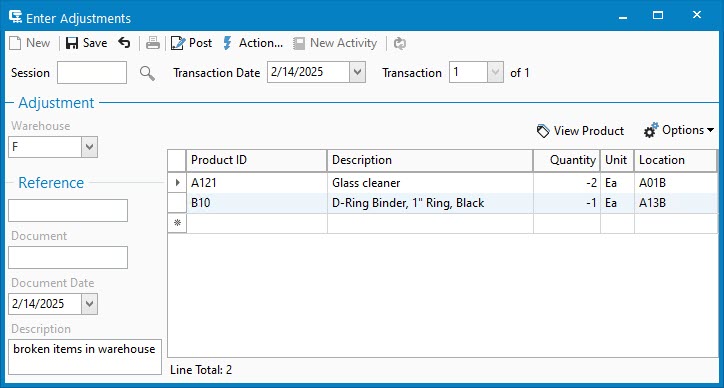
  2. Click New (Ctrl-N) to create a new session.
  3. Set the Session Date as of the day you want the inventory adjustment applied.
  4. Set the Warehouse.
  5. Add the product to be adjusted and the quantity that you want to add/remove.
    1. To add 3, Quantity is positive (3).
    2. To remove 3, Quantity is negative (-3).
    3. If utilizing Lot / Serial Numbers with Acctivate, select the Lot / Serial Number being adjusted.
    4. If utilizing Bin Locations, specify the Location being adjusted.
  6. Save the session to Print the Inventory Adjustment register or skip to the next step.
  7. Click Post.
  8. Once posted, users with proper access will be prompted to Preview, Print, or Cancel report printing. This report can be accessed at any time through the inventory reports menu.

Inventory Adjustment Posted


Next Steps

Previous Training Topic

Previous Topic:
Inventory Receipt for Lot Numbers Split/Product Break Down 

Customer Training

Training:
Customer 

Inventory Transactions Training

Training:
Sales 

Next Training Topic

Next Topic:
Balance Adjustment 

 •  Overview

General

 •  Getting Started

 •  Windows & Features

 •  Create & Modify Filters on Lists

 •  Synchronize with QuickBooks

Business Activities

 •  Activities List

 •  Relate Activities to Documents & Transactions

 •  Business Activity Review

 •  Overview

Product Basics

 •  Product List

 •  Create a New Product

 •  Product Prices

Product Management

 •  Import Products

 •  Manage Product Components

 •  Manage Alternate Units of Measure on Products

 •  Setup Catch Weight/Variable Pricing

 •  Overview

Create a Purchase Order

 •  Create a PO Manually

 •  Reorder Inventory Based on Demand

 •  Purchase Order Statuses

Receive & Invoice a Purchase Order

 •  Purchase Order Receipt

 •  Purchase Invoice

 •  Allocate Other Amounts on Vendor Bill via Landed Cost

Additional Processes

 •  Vendor Returns

 •  Purchase with Catch Weights

 •  Overview

Sales Basics

 •  Sales List

 •  Customer Price Check Utility

Quotes

 •  Create a Sales Quote

 •  Print & Email a Quote

 •  Manage Quotes

 •  Convert Quote to Order

Order Entry

 •  Create a Sales Order

 •  Import Online Orders via Webstore Sync

 •  Import Sales Quotes & Orders

 •  Mobile Order Entry

Order Processing Basics

 •  Approve Credit Holds

 •  Send Order Acknowledgment

 •  Rescheduling Sales Orders

 •  Kitting on Sales Orders

Service Orders

 •  Add Time & Materials to Business Activities

 •  Create Service Orders

 •  Service Scheduling

 •  Service Billing

Advanced Order Processing

 •  Drop Shipments

 •  Special Orders

 •  Process EDI Transactions

 •  Catch Weight Pricing on Sales Quotes & Orders

 •  Create/Edit Existing Sales Order Import Template

Order Picking

 •  Pick Ticket

 •  Create a Pick List

 •  Select Bin Locations on Orders

 •  Select Lot or Serial Numbers on Orders

 •  Mobile Order Picking

 •  Mobile Pick Lists

Order Packaging

 •  Packing Slips

 •  Packaging Management

 •  Create a Shipment in Packaging Manager

 •  Packaging Shipment in Packaging Manager

Order Shipping

 •  Process Shipments via Shipping Workstation Integration

 •  Shipping with Packaging Manager

Payment Entry

 •  Enter Customer Payments

Order Invoicing

 •  Create Invoices from a Sales Order

 •  Batch Invoices

Credit Memos

 •  Create a Credit Memo

 •  Invoice a Credit Memo

 •  Overview

Edit Customer Window Overview

 •  Update Basic Customer Information

 •  Manage Customer Ship To Locations

 •  Customer Contact Management

 •  Customer Credit Specifications

 •  Product Invoice History for Customer

 •  Customer Orders

 •  Customer Specific Product IDs

 •  Invoice & Payment History for Customer

 •  Sales History, Marketing Information & Webstore Customer ID

 •  Emails Sent from Customer Window

 •  Customer Pricing Rules

 •  Business Activities Related to Customer

Customer List & Credit Management

 •  Customer List

 •  Credit & Collection Features

Create Customers

 •  Create New Customer Manually

 •  Import Customers

 •  Create Customer Jobs

 •  Overview

Receipts

 •  Purchase Order Receipt

 •  Mobile Receiving

 •  Inventory Receipt for Lot Number Split/Product Breakdown

Adjustments

 •  Inventory Adjustment

 •  Inventory Balance Adjustment

 •  Inventory Issue

 •  Inventory Count

 •  Mobile Inventory Counts

Transfers

 •  Inventory Transfer

 •  Mobile Inventory Transfers

Assemblies

 •  Inventory Assembly

 •  Mobile Inventory Assemblies

 •  Assembly Workflow Status Configuration

Landed Cost

 •  Vendor Bill Allocation to Inventory Cost

Track & Trace

 •  Track & Trace Inventory Movement for Lot/Serial Items

Void Transactions

 •  Void Inventory Sessions


Company

  • About Acctivate
  • Branding
  • Privacy & disclaimers
  • Careers
  • Contact us

Community

  • Technology partners
  • Referral program
  • Partner directory
  • Partner program
  • Partner resources
  • Inventory glossary
  • Blog

Features

  • Barcoding software
  • Bill of materials (BOM), Kitting & Assemblies
  • Tracking inventory task activity
  • Catch weight management
  • Credit management
  • Customer management
  • eCommerce inventory management
  • EDI management software
  • Hosted inventory management
  • Import export software
  • Inventory dashboard
  • Inventory forecasting
  • Landed cost
  • Manufacturing
  • Matrix inventory
  • Multi-channel inventory management
  • Multi currency
  • Order fulfillment
  • Order management
  • Pricing tools
  • Process manufacturing
  • Purchasing management
  • Reporting
  • Retail counter sales
  • Service and repair management software
  • Traceability
  • Wholesale distribution

How to buy

  • Learn Acctivate
  • Acctivate Benefits
  • Inventory Module Features
  • Acctivate Onboarding
  • System requirements
  • Free Trial
Connect with us
Acctivate on Facebook Acctivate on Instagram Acctivate on Linkedin Acctivate on Twitter Acctivate on YouTube

© 2022 Alterity, Inc. All rights reserved. ACCTivate! is a registered trademark of Alterity, Inc., registered in the U.S.
Privacy & Disclaimers