Pick Ticket


Print or Email
Sales Order picking is a crucial step for processing orders and managing inventory. The picking process starts with creating the pick ticket. There are two primary ways to create it; from the Sales Order window or from the Order Manager.
Depending on your default workflow status for new Sales Orders, you may need to update the Workflow Status of a sales order to be Ready to Pick. While a sales order isn’t required to have a workflow status of Ready to Pick in order to print a Pick Ticket, placing orders into that workflow status will make it easier for other users to find orders that they can start picking. For mobile picking, it is required that the order be in the status of Ready to Pick to start the picking process.
The Pick Ticket will only display Scheduled quantities to pick and it will exclude non-tangible products such as Shipping, Labor, Fees, etc. Additionally, there must be a scheduled quantity on the Sale Order to print a Pick Ticket. The form will not print with only backordered lines. If the order was already invoiced in full, you will not be able to print the form without voiding the invoice.
Print / Email Pick Ticket from a Sales Order
In the Enter Sales Order window, the Next Action Button will display the suggested next action for a Sales Order. If you have the “Show Pick Ticket Button” option enabled in the Configuration Manager, the Next Action Button will display Pick Ticket when then the next suggested action in processing this sales order would be to print a Pick Ticket. While the next action in the order may be to print it, you should verify the order is ready to pick by checking the sales order Workflow Status in the upper right hand corner.
Print Pick Ticket Using Next Action Button on Individual Order
- Open the Enter Sales Order.
- Click the Pick Ticket action button.
- The Pick Ticket will preview for you to print out.

Print or Email Pick Ticket from Action menu on Individual Order
- Open the Sales Order.
- Go to Action > Print or Action > Email > Pick Ticket.
Note: When emailing the document, the To: email address will be the email address of the Branch associated with the sales order.

After printing or emailing it, the sales order status will change to Pick in Progress.

If you need to re-print/email a Pick Ticket, print/email it out of sequence, or if you don’t have the “Show Print Pick Ticket Button” enabled but want to print/email it, you can use the Action > Print / Email > Pick Ticket menu option on the Enter Order window.
Print a Pick Ticket from the Sales Order Manager
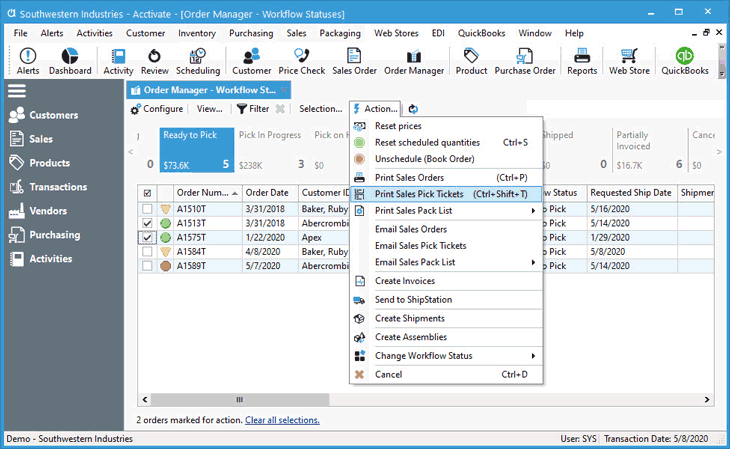
In many cases it makes sense to print out Pick Tickets for multiple orders at the same time. This can be done from Order Manager.
- Open Order Manager.
- Click on View > Workflow Statuses.
- Click on the Ready to Pick.
- Check off one or more Sales Orders.
- Click Action > Print Sales Pick Tickets or Action > Email Sales Pick Tickets.
Note: When emailing it, an email will be created for each order and the To: email address will be pulled from the Branch associated with the sales order. - After printing/emailing it, the sales order will change to Pick in Progress.


