Transactions List


The Transactions List in Acctivate is your central hub for reviewing, managing, and editing inventory transactions. This guide will show you how to find and work with transactions using the tools available in the Transactions List window.
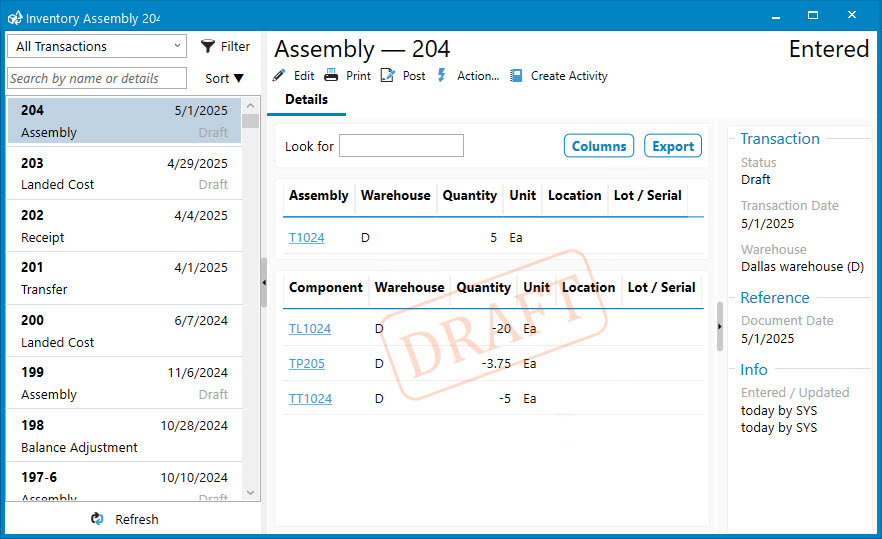
To open the Transactions List, select Transactions from the left-hand menu in Acctivate. The window is organized into three main areas:
- Search Bar, Sort, and Filters (with the transaction list)
- Available Actions
- Transaction Details and Information Sidebar
Tip: When viewing a list of transactions, refer to the window as the Transactions List.
When viewing or editing a single transaction, use the term Transaction window. The Enter Transaction windows are separate screens used specifically for create or edit inventory transactions.
Search Bar, Sort, and Filters
At the top-left corner, you’ll find a Search bar. As you type, the transaction list automatically filters based on these fields:
- Session Number (called “Reg Number” in filters)
- Transaction Number
- Transaction Type (e.g., Adjustment, Issue, Landed Cost, Count, Assembly, Receipt, Balance Adjustment, Transfer)
- Transaction Date
- Transaction Status (Voided, Draft)
To sort the list, click the Sort text. An arrow indicates whether the list is sorting in ascending or descending order.
Above the Search bar is a filter menu where you can choose from two defaults or your own custom filters. The default filters are Posted Only and All Transactions.
Creating Custom Filters for Transactions
- Select the All Transactions filter
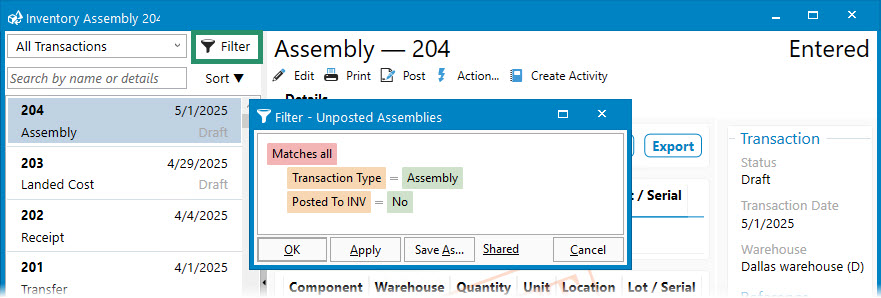
- Click the Filter button
- Hover over Matches All text and click the +
- Choose Add Condition
- Click the Reg Number text to select from any of the available fields
- Adjust the filter type by clicking the = sign to choose from the available filter types (e.g., equals, contains, etc.)
- Enter value(s)
- Adding Transaction Type = Assembly and Posted To INV = No shows a list of unposted assemblies. This translates to your work in progress list.
- Repeat to add additional conditions or groups
- Click Apply to use the filter temporarily, or Save As to name and save for future use. You can also choose whether to share with all users or keep private.

Available Actions
Below the transaction type and session number, you’ll see a row of action buttons, which vary depending on whether the transaction is unposted (draft) or posted.
For Unposted (Draft) Sessions
You can do any of the following:
- Edit: Opens the Enter Transaction window to modify details.
- Print: Previews or prints the transaction report.
- Post: Finalizes and posts the transaction.
- Action Menu which includes:
- Add Transaction
- Delete Transaction
- Split Transaction
- Delete Session
- Change Workflow Status (Assemblies only)
- Create Activity: Links the transaction to an Activity for tracking tasks, notes, or follow-ups.
For Posted Sessions
Only the following options are available:
- Void
- Create Activity
Note: Once a transaction is posted, it becomes ready-only and cannot be edited.
Transaction Details
When you select a session, the Transaction Type and Session Number appear prominently at the top. Below the action buttons, the Details grid shows the lines included in the transaction. You can:
- Use the Look for box to search the line items.
- Click Columns (admin only) to control which fields are visible for all users.
- Click Export to send the transaction lines to an Excel spreadsheet.
Fields may include:
- Product ID
- Quantity
- Unit
- Unit Cost
- Amount (for posted transactions only)
- Warehouse
- Lot/Serial Number

Information Sidebar
On the right-hand side, toggle the Information Sidebar to view session-level data, including:
- Status
- Transaction date
- Created/updated timestamps
- User who created or modified the session


