Inventory Assembly


An Inventory Assembly in Acctivate allows you to purchase multiple raw material items and combines/consumes them into a single finished product to be stocked and sold. Acctivate will keep track of all inventory and material costs for this new product. Building the inventory assembly item rolls up the cost of the components into the finished good. The finished good is then used on a sales order and invoiced with the full associated cost of goods sold.
Review Inventory Assemblies
- Choose the Transactions list from the left navigation bar.
- Search for and locate the session or transaction types in question.
- Select session for review.
- Sessions saved, but not posted will show Draft on the list, as well as a watermark on the read only window for the transaction. These can be modified before posting by clicking the Edit button.
- Posted sessions will show more information, such as unit cost and amount adjusted.
Create Inventory Assembly Session from Enter Sales Order Window
When Assembly products are listed on a sales order and the available quantity is less than what is needed to complete the order, the outstanding quantity will be placed on backorder. Acctivate allows users to generate a new Assembly work order directly from the sales order, this also means that the inventory that is produced will have a direct link back to the original sales order. Once posted into inventory, it will be allocated back to the original sales order with any other details attached (lot / serial number, bin location, etc.)
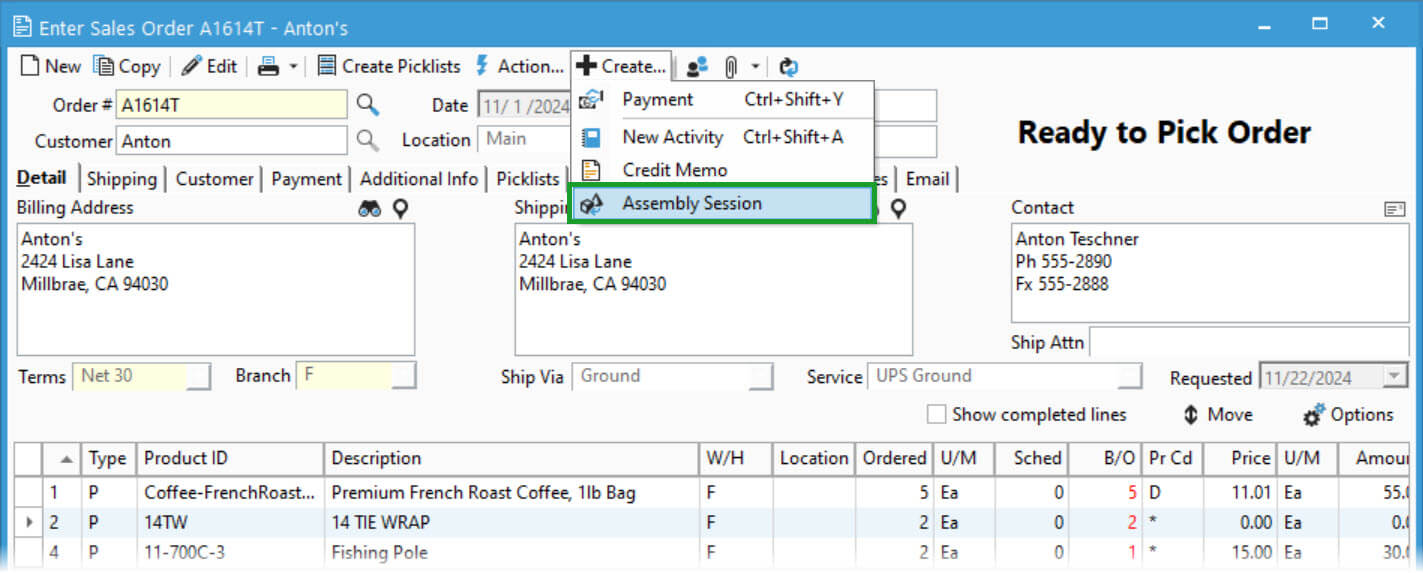
- Locate and open the Sales Order in question.
- If in Edit Mode, Save the order.
- Click Create > Assembly Session to create one session for any assembly listed as backordered on the sales order details.
- The newly created session will open in the Enter Assemblies window to be processed. See Managing and Posting Inventory Assembly Session section for details on the window and how to post.
Create Inventory Assembly Sessions from Order Manager
Creating an assembly session from Order Manager acts similarly to creating one from an individual order. The main difference is creating sessions for multiple orders vs one session for an individual order. When posted, any lot / serial number or bin location selected will be allocated to the linked sales order.
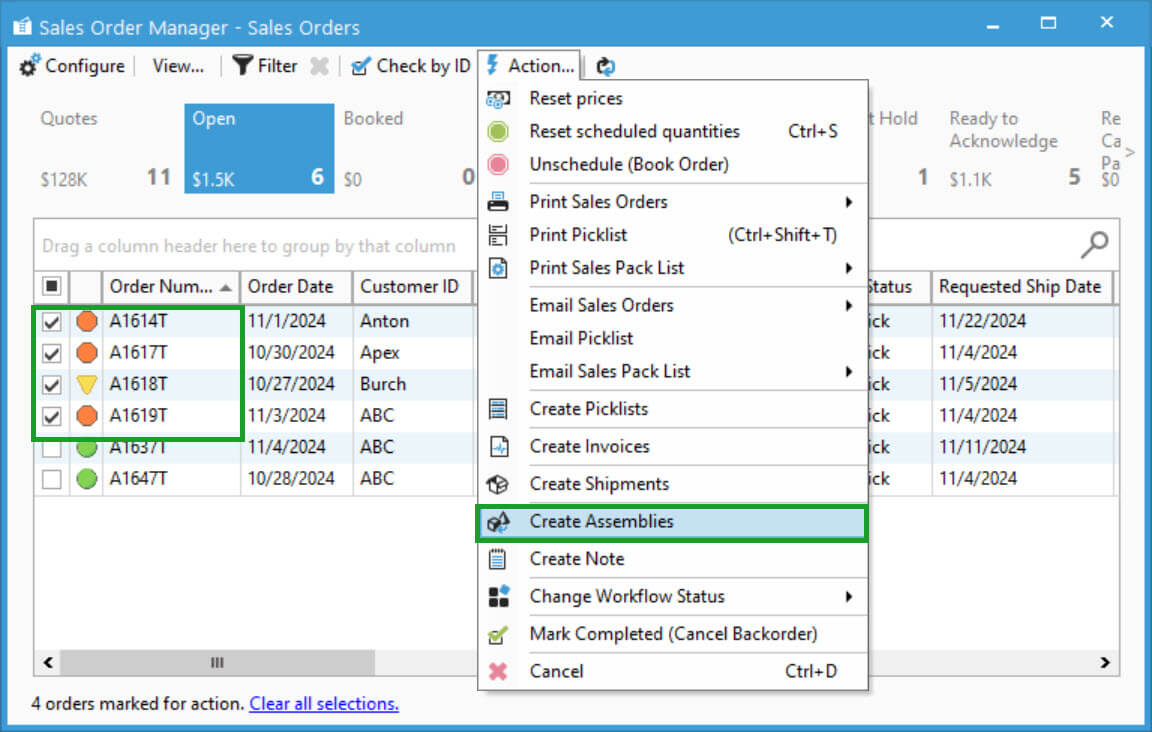
- Open Order Manager.
- Select the orders with backordered quantities.
- Action > Create Assemblies.
- Choose Yes to create assembly sessions for selected orders.
- Click OK on next prompt showing newly created session numbers. See Managing and Posting Inventory Assembly Session section for details on the window and how to post.
Create Assemblies via Inventory Manager
Use the Inventory Manager to add products to the Create Assemblies window and create assemblies for stock, demand, or both. Once products are added, review and adjust build quantities before finalizing the assembly sessions.
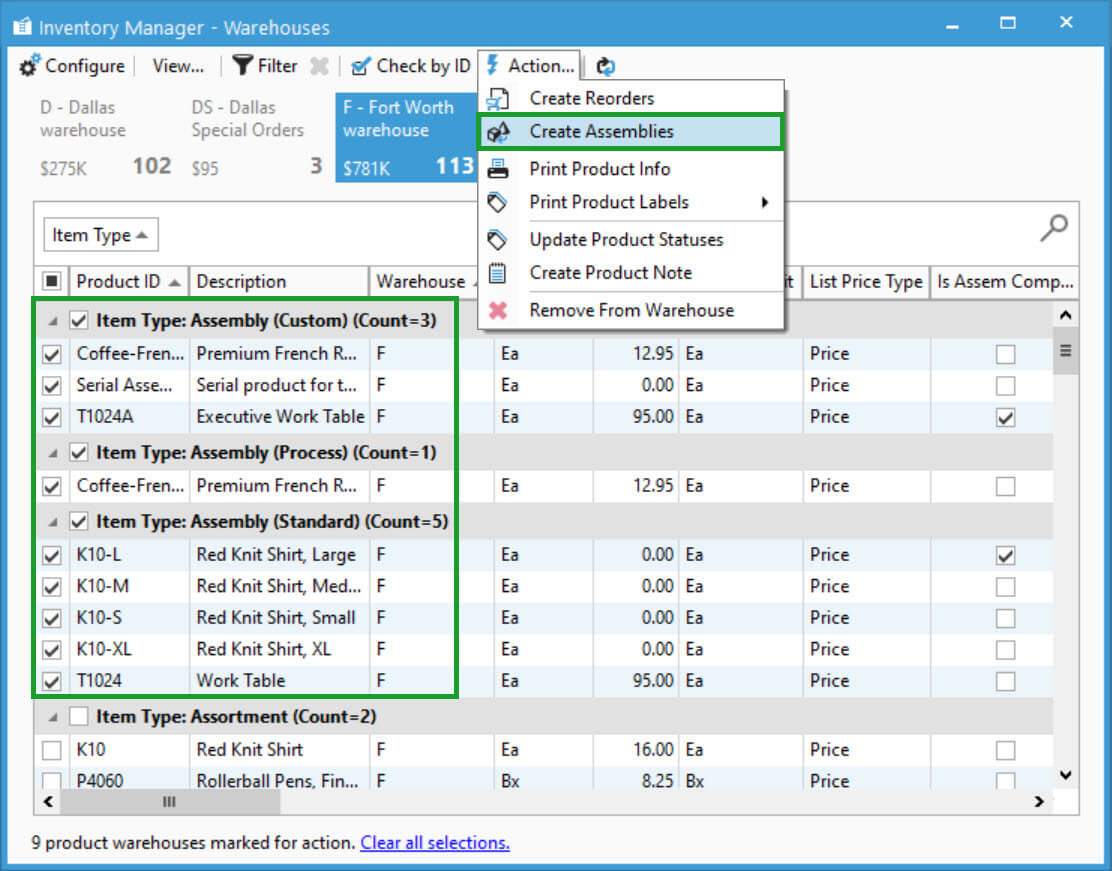
- Open Inventory Manager: Click the icon on the icon bar or go to Inventory > Inventory Manager.
- Toggle the View based on your needs:
- Restocking > Build: Displays assemblies to build based on current demand. (Filtered by availability, only showing assemblies with demand).
- Warehouses: View items by warehouse to build for stock.
- Tip: Drag the Item Type column to the grouping panel to isolate assembly items. You can select all items in the group by checking the box next to the group header.
- Product Class: Filter by item category to build for stock. (Grouping tips apply here too).
- Custom View: Set up a button bar to see a customized list of items, such as only assembly products, with filters like product class, warehouse, or availability.
- Select Products: Check the box next to each product (or group of products) you want to assemble.
- Click Action > Create Assemblies
- Review the Confirmation needed pop up: message will show how many products will be added, as well as other pertinent information. Click Yes to continue or No to cancel and update your selections.
- Choose Yes to continue to the Create Assemblies window or No to cancel and update the selections.
- On the Create Assemblies window, review the Build Qty for each item. Acctivate suggests quantities based on current demand. Click on a row to see why a specific quantity is suggested, shown in the right panel. If you’re building for stock, update the Build Qty to reflect how many assemblies you plan to complete.
- Check the box next to each product row or select all when you’re ready to create the assembly session.
- Click Create Assemblies
- An informational message appears with the number of transactions to be added in the new assembly session. Choose Yes to continue to session or No to cancel and go back.
- The Enter Assemblies window will open on the session created with a transaction for each product selected on the Create Assemblies screen. See Managing and Posting Inventory Assembly Session section for details on the window and how to post
Managing and Posting Inventory Assembly Session

- To create an assembly workorder or open an existing session, go to Inventory > Inventory Assemblies.
- Click New (Ctrl-N) to generate a new session. To open an existing session, select unposted session from the drop down, click Edit and skip to step 6.
- Set the Session Date as of the day you wish the assembly to be posted into stock.
- Select the Product ID for the Finished Good.
- Choose the Warehouse where the item is stocked after posting.
- Input the quantity to build
- When utilizing Process Assemblies, users can specify a different yield quantity than the build quantity. Variable component quantities won’t adjust when only modifying the yield. Any component not checked as variable will adjust based on changes to the yield.
- If the finished good is Lot / Serial numbered, you will be required to enter a lot number before posting. Serialized finished goods will require a build quantity of 1 per transaction.
- If utilizing bin locations, select warehouse location where the product will be stocked in prior to posting.
- Components, component warehouse, and component quantities will populate based on the Bill of Materials of the Finished product. Verify the proper component warehouse is used for each row.
- When utilizing Custom / Process Assemblies, components can be marked as variable. Variable components will have an editable Act Qty (Actual Quantity) field for the user to update based on actual component usage. Additionally, components can be added on the fly, as well as removed from the transaction. To remove a variable component, select the row and use the Delete key on your keyboard.
- If any of the components are Lot / Serial Numbered, you will be required to select the lot/serial number before posting the assembly. When needing more than one lot listed on the transaction to accommodate the build qty, the user will be prompted to add the product as another row to the transaction to select another number. Continue this process until all necessary lot / serial numbers are listed.
- If locations are enabled, select warehouse location the component is being pulled from.
- When the assembly process itself can take some time to complete, users can select an assembly workflow status to track where it is in the process. These statuses are for informational purposes only and do not effect posting status.
- Save the session to Print the Inventory Work Order. This prints like the purchase order form and shows all pertinent information for building the product.
- When assembly is ready to go into stock, Post the session.
- When posting a session with multiple transactions, each transaction is posted in number order. Multi-level assembly items using lot/serial numbered components being created by a transaction within the same session will need to be split out and posted separately.
- Once posted, users with proper access will be prompted to Preview, Print, or Cancel report printing of the Inventory Assembly Register. This report can be accessed at any time through the inventory reports menu.

