Create a Credit Memo


You have multiple options to create a credit memo in Acctivate. Customer credits can be created from the original sales order, customer record, sales menu/icon, or business activity. The most common being from the original sales order. Doing so will copy all information from the sales order to the credit memo for the user to modify as needed.
Acctivate gives the users the additional option of processing it as a return of goods or a simple balance credit for the customer. The differences between these 2 scenarios are covered in the Enter or Modify Credit Memo Details section below.

Create a Credit Memo from Sales Order
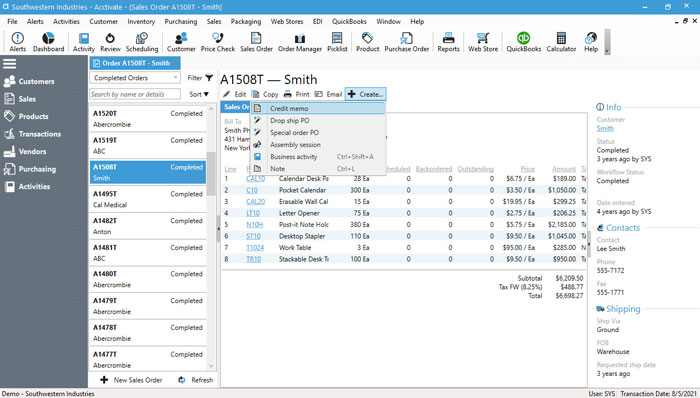
Users can create a credit from both the Sales list and the Enter Sales Order window. Both involve navigating to the order in question and clicking + Create > Credit Memo. When utilizing this option, the credit is created as a copy of the order with negative quantities and amounts.
Create a Credit Memo from Menu/Icon
A second option for entering a new Credit Memo is to select Sales > Enter Credit Memos from the title menu or adding it as a button to the icon bar to jump to the window with one click. This will open a blank credit window. You then Click New (or press Ctrl+N) to add customer and product details. Before saving the credit be sure that Customer, Terms and Branch have been selected.
Create a Credit Memo from Customer
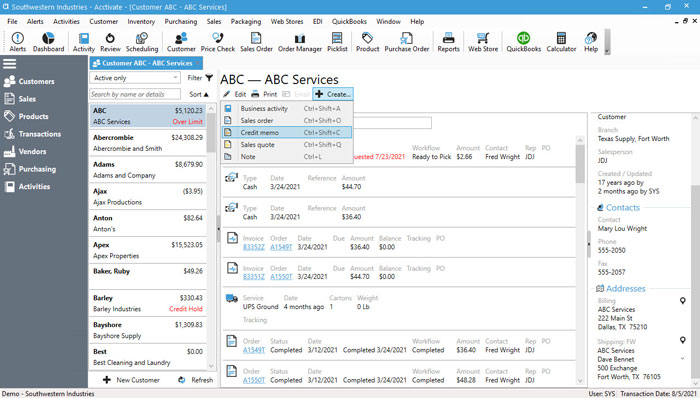
Yet another option to create a new credit is from the Customer List or Edit Customer Window. Both require the user to navigate to the customer, selecting the proper ship to location (if needed), and clicking + Create > Credit Memo. The new credit will include the selected customer and ship to location without any product details.

Create a Credit Memo from Business Activities
With business activities and service billing, credit memos may also be generated from the business activities window. If the Customer, Time, and Materials have all been added to the Business Activity, you are ready to click the Create > Credit Memo to generate a credit.
Entering or Modifying Credit Memo Details
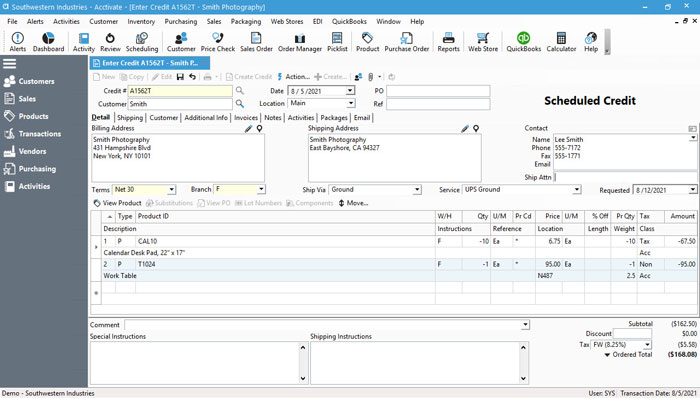
When creating from the customer or sales order windows, the customer will already be filled in on the Enter Credit Memo window. If you created it outside of these windows, you’ll need to add the customer to the order by either typing the full customer name and pressing tab or using the lookup window to select. Terms, Branch, and Sales Rep (not required) default from the customer record. Make sure to select these values before saving the credit.
The instructions below go over how to add products to the credit memo details. If you’ve copied an existing Sales Order to create the credit, simply update the details already listed as needed.

- Add/Edit the products being returned to the Detail tab of the Credit Memo window.
- To remove lines after creating from original order, highlight the row(s) and press the Delete key on your keyboard or use the shortcut CTRL + Delete.
- To add products manually, type the full Product ID, Alternate Product ID, or Customer Product ID and press Tab. If the product ID is unknown, use the product lookup by clicking browse button or F4 on your keyboard with cursor in Product ID field.
- Line Type is how users control whether the product is being returned to the warehouse or not. Update the line type to N for products not being returned to the warehouse. When doing so, the warehouse will be removed from the line. To return product to stock, use P or S line types.
- Verify W/H listed is the one receiving the return. It’s best to process return to original warehouse and transfer quantity to alternate warehouse to review damages prior to resale.
- Enter or Update Qty to be returned/credited. If they’re returning a unit and you’re sending them another, the return would be negative quantity while the new product being shipped would be positive quantity.
- Select/Verify lot/serial numbers selected for items requiring a unique identifier. Copying original order will auto select these values.
- Verify Price is correct and override, if necessary. This includes any line discounts and verifying the total line amount.
- Repeat steps 1-4 until all lines are added/updated.
- Make sure all other details required are entered. Things to take into consideration: Reference, Ship Via, Comment, Special Instructions, and Shipping Instructions.
- When all data entered, Save the quote by clicking the save icon or CTRL+S on your keyboard. Saving this creates the Credit Memo Proof which can be printed or emailed to the customer. This step does not create the credit invoice. If you’re not waiting on receipt of a return or have already received it, go to the Create Credit Invoice page.


