Fulfilling Multiple Orders with Acctivate Mobile Pick List Picking

With the use of pick lists, bin locations, and Acctivate Mobile, warehouse personnel are shown an efficient route for picking multiple sales orders to quickly move through the fulfillment process. Once the pick list is created on the desktop app, users can select one to pick however many orders are included. After selecting a pick list on the mobile device, the workflow status of the sales order updates to Pick in Progress.
Prior to use, make sure to review the mobile order picking options prior to using this functionality. It is also recommended to create separate Acctivate users for warehouse employees as the system locks picking down per user.
The instructions below combine the use of Android and Windows mobile devices. If any differences exist, they are notated within the step. For customers not utilizing pick list, check out the Sales Order Picking with Acctivate Mobile training page.
Pick List Picking on Acctivate Mobile
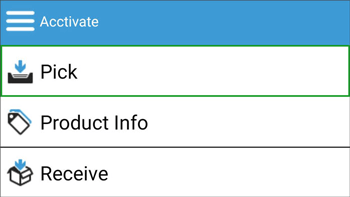
- After logging into the Android app, click Pick on the main screen. On Windows Mobile (WM) devices, choose Sales Order > Picking.
- The different devices have slight deviations on the first screen you see after step 1:
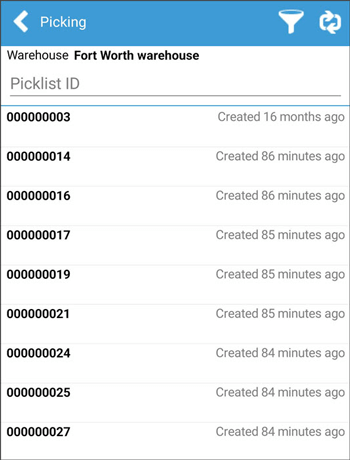
- Android: A list of available picklists will be displayed based on the warehouse used on the last pick. Select Warehouse to choose alternate warehouse for picklist selection.
- To filter what you see, click the funnel icon in the upper right-hand corner.
- Scan, type in a picklist ID, or click on a picklist to open it.
- Windows Mobile: Filtering and warehouse selection are done prior to opening the picklist itself or viewing a list. Toggle the drop down at the top of the screen to pick oldest, choose from list, or enter picklist ID. Below this selection, choose the proper W/H.
- Click right arrow to progress to next screen. Depending on the selection, you’ll see the following:
- Pick oldest: The oldest picklist will immediately be opened for picking rather than allowing user to choose or select an existing picklist.
- Choose from list: View the full list of picklists based on selections. Select or scan a picklist to open.
- Enter picklist ID: Scan, lookup to select, or type the picklist ID in the field.
- Click right arrow to progress to next screen. Depending on the selection, you’ll see the following:
- Android: A list of available picklists will be displayed based on the warehouse used on the last pick. Select Warehouse to choose alternate warehouse for picklist selection.
- After selecting a picklist, the Details tab will show the Product ID and the picked quantity out of the total scheduled quantity to pick. Below the Product ID you will see the warehouse location. Toggle the Hide picked details option to hide or show lines already been picked in full. The Info tab (circle button with i in top right corner on WM) shows the orders listed for each product on the picklist, as well as the warehouse map and distance to next location.
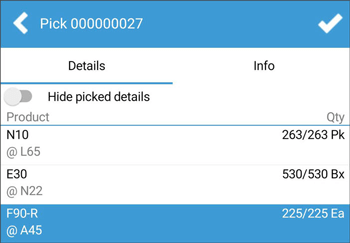
- To start picking, select the first product or scan the item barcode.
- Standard control products which do not require a lot/serial number will show the pre-selected location, as well as the default pickedqty (0 or scheduled qty from order depending on mobile picking options). When using a product barcode, the quantity goes up by one for each scan. Alternatively, you can also manually enter the picked qty.
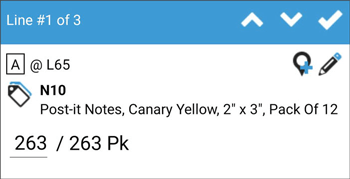
- To edit the pre-selected location, click the pencil icon to scan, select from lookup, or enter the location into the proper field.
- Adding additional locations are done by selecting the map + icon. This will open a screen where you can scan, type in, or lookup the location that the remaining quantity will be picked from. Once you select a location, it will split the remaining quantity to pick into a new picklist line.
- To pick a lot or serial control product:
- If the barcode you are scanning is a GS1-128 barcode encoded with the Product ID and Lot/Serial number, you can perform a single scan on this screen, which will add the lot and increment the picked quantity by one. Continue scanning or update the picked quantity on screen until full picked qty listed.
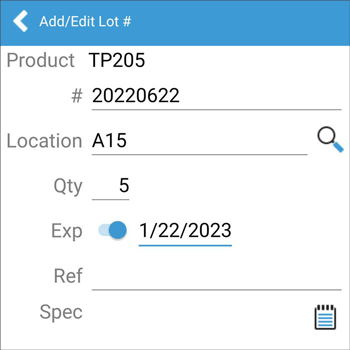
- When the barcode only includes the product ID, scanning the barcode will open that picklist line for the user to add the lot/serial number by either scanning a separate barcode with the number, selecting from the lookup, or manually entering the lot/serial number after clicking the #+ button.
- After selecting a lot/serial number and specifying proper pick qty, click the devices back button or use the back arrow in the upper left-hand corner to return to the previous screen
- To add another lot/serial number for the same item, click the #+ button again.
- To delete a selected lot, long press the lot/serial number screen until the Delete button appears.
- If the barcode you are scanning is a GS1-128 barcode encoded with the Product ID and Lot/Serial number, you can perform a single scan on this screen, which will add the lot and increment the picked quantity by one. Continue scanning or update the picked quantity on screen until full picked qty listed.
- Standard control products which do not require a lot/serial number will show the pre-selected location, as well as the default pickedqty (0 or scheduled qty from order depending on mobile picking options). When using a product barcode, the quantity goes up by one for each scan. Alternatively, you can also manually enter the picked qty.
- Toggle the Up/Down arrows to move through the lines on the picklist until all lines are verified/picked.
- To move back to the main pick screen, use the back arrow on your device or click the same button on the top left-hand corner of the screen.
- When ready to submit the picklist to complete or save your progress, click the checkmark in the upper right-hand corner on Android or the back button on WM.
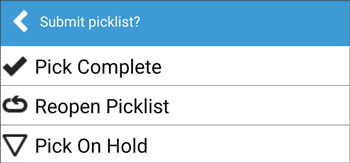
- The Submit picklist? Screen opens with the following options
- Pick complete: Submits the completed picklist details to the sales order window in Acctivate.
- Reopen Picklist: This will return you to the picklist to continue editing.
- Pick On Hold: Updates the workflow status and leave picklist open with saved changes from session. This can be completed at another time.
- Discard Changes (WM only): Removes all picklist changes entered for selected picklist. This option can also be done by clicking the back button from the submit picklist window on both devices.
