QuickBooks Inventory Management Software | Acctivate

QuickBooks Inventory Management Software

  • Home
  • Solutions
  • Explore
  • Support
  • Contact
  • Free Trial
  • Onboarding
  • Training
  • Downloads
  • Documentation
  • Knowledge Base
 

Create a Sales Quote

Manually Create a Sales Quote

You have multiple options to create a sales quote in Acctivate. Sales Quotes can be created from the customer record, or from the Sales menu: Sales > Enter Sales Quote.

IN THIS ARTICLE
 •  Create from Customer Info
 •  Create from Menu/Icon
 •  Create from Business Activities
 •  Enter Quote Details

Create a Sales Quote from Customer Info/List

To enter a new sales quote from the Customer window you will click the Create Button (Create > Create Sales Quote).  This will open the edit Sales Quote window and will auto fill the Sales Quote with the customer’s information.  Once the Edit window loads you are ready to click into the Product ID field and start adding products.  Before saving the quote be sure that Customer, Terms and Branch have been selected.
Create a sales quote

Create a Sales Quote from Menu/Icon

A second option for entering a new sales quote is to select Sales > Enter Sales Quote from the menu bar.  This will open a blank quote window.  You then Click New (or press Ctrl+N) to edit the quote.  This will place the quote in Edit mode and allow you to select the customer and products.  Before saving the quote be sure that Customer, Terms and Branch have been selected.

Create a Sales Quote from Business Activities

If licensed for Business Activities and Service Billing, sales quotes may also be generated from the Business Activities window.  If the Customer, Time and Materials have all been added to the Business Activity you are ready to click the Create > Sales Quote to auto generate a sales quote.  Before saving the quote be sure that Customer, Terms and Branch have been selected.

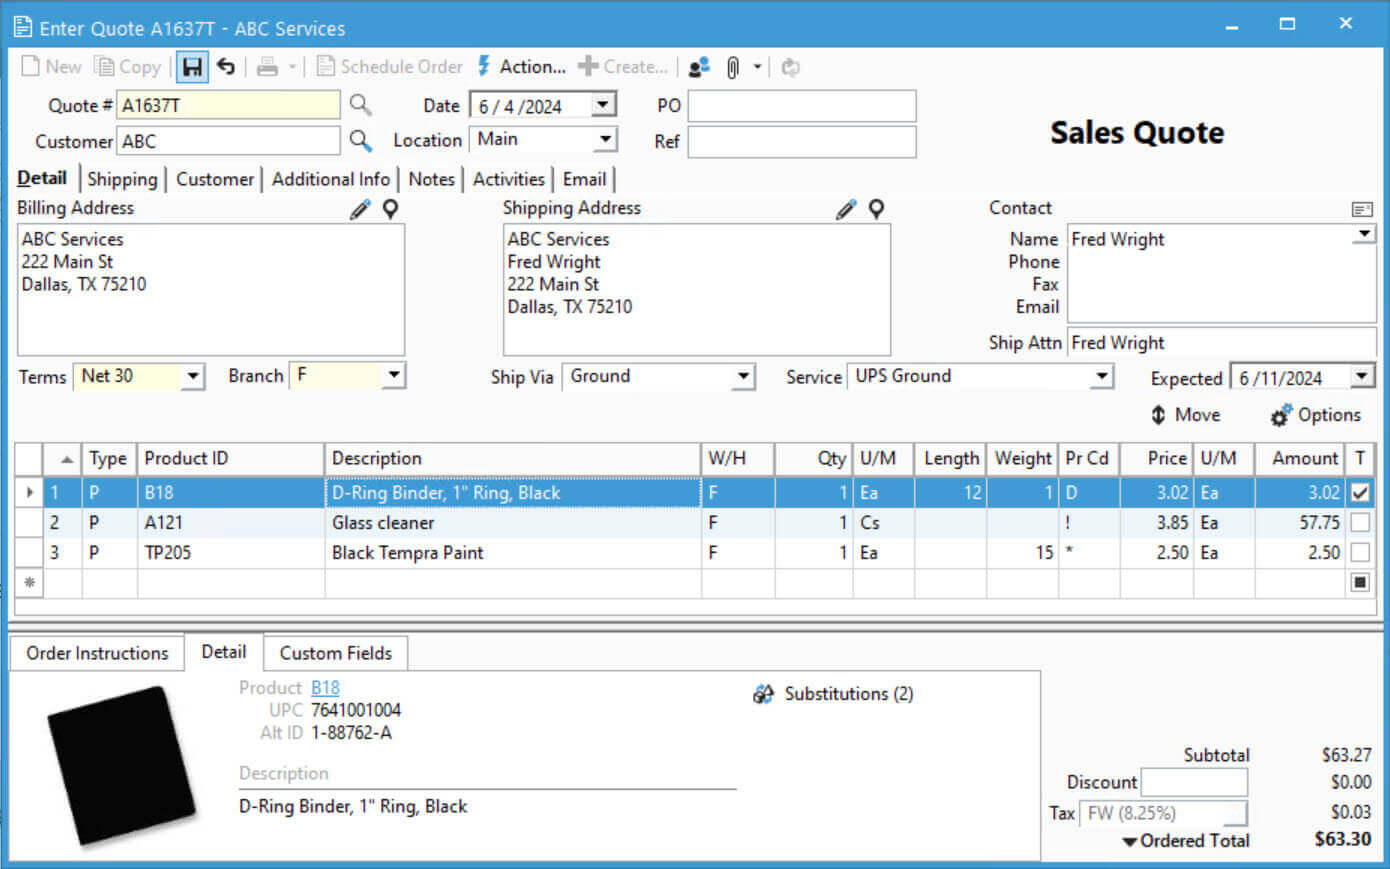
Create a New Sales Quote: Entering Sales Quote Details

When creating from the customer windows, the customer will already be filled in on the Enter Sales Quote window. If you created it outside of the customer windows, you’ll need to add the customer to the order by either typing the full customer name and pressing tab or using the lookup window to select. Terms, Branch, and Sales Rep (not required) default from the customer record. Make sure to select these values before saving the quote.

  1. Line Type is only required to select when needing to add note lines, non-standard products, or to change a P line product to D or S. See the full list of line types here.
  2. Add the products being ordered to the Detail tab of the Sales Quote window.
    1. Type the full Product ID, Alternate Product ID, or Customer Product ID and press Tab
    2. Use the product lookup by clicking browse button or F4 on your keyboard with cursor in Product ID field.
  3. Verify W/H listed is the one being shipped out of. This will default based on the Branch when a Default Warehouse is assigned to it. If no default set on the Branch, the first warehouse assigned to the product in alphabetical order will appear.
    1. We suggest adding numbers to the warehouse IDs if you need to see them in a different order in the drop downs. Acctivate will sort warehouses in ascending order.
  4. Enter Qty to be quoted
    1. The U/M defaults based on the Sales unit assigned to the product. Users can toggle this to another U/M, if alternate unit relationship exists.
  5. Verify Price is correct and override, if necessary.
    1. Alternate Prices outside of List Price (*), Customer Specific (!), or Default Price Code Price for the selected customer are available to select in the Pr Cd field. To do so, put the cursor in the field and click the browse button.
  6. If offering a line discount outside of the selected price on the order, enter it in the % Off field as a whole number. For example, 50% off the line would be entered as 50.
  7. When needing to add instructions to print on the form below the description of the product, do so in the Instructions field. Users can click the browse button to show a full text box for data entry purposes.
  8. Make sure all other details required are entered. Things to take into consideration: Expected and Followup Dates, Reference, Ship Via, Comment, Special Instructions, and Shipping Instructions.
  9. To enter a whole order discount, add the amount or percent to the Discount field below the Subtotal.
  10. When all data entered, Save the quote by clicking the save icon or CTRL+S on your keyboard.

Next Steps

Previous Training Topic

Previous Topic:
Customer Price Check Utility 

Purchasing Training

Training:
Purchasing 

Customer Training

Training:
Customers 

Next Training Topic

Next Topic:
Print & Email a Quote 

 •  Overview

General

 •  Getting Started

 •  Windows & Features

 •  Create & Modify Filters on Lists

 •  Synchronize with QuickBooks

Business Activities

 •  Activities List

 •  Relate Activities to Documents & Transactions

 •  Business Activity Review

 •  Overview

Product Basics

 •  Product List

 •  Create a New Product

 •  Product Prices

Product Management

 •  Import Products

 •  Manage Product Components

 •  Manage Alternate Units of Measure on Products

 •  Setup Catch Weight/Variable Pricing

 •  Overview

Create a Purchase Order

 •  Create a PO Manually

 •  Reorder Inventory Based on Demand

 •  Purchase Order Statuses

Receive & Invoice a Purchase Order

 •  Purchase Order Receipt

 •  Purchase Invoice

 •  Allocate Other Amounts on Vendor Bill via Landed Cost

Additional Processes

 •  Vendor Returns

 •  Purchase with Catch Weights

 •  Overview

Sales Basics

 •  Sales List

 •  Customer Price Check Utility

Quotes

 •  Create a Sales Quote

 •  Print & Email a Quote

 •  Manage Quotes

 •  Convert Quote to Order

Order Entry

 •  Create a Sales Order

 •  Import Online Orders via Webstore Sync

 •  Import Sales Quotes & Orders

 •  Mobile Order Entry

Order Processing Basics

 •  Approve Credit Holds

 •  Send Order Acknowledgment

 •  Rescheduling Sales Orders

 •  Kitting on Sales Orders

Service Orders

 •  Add Time & Materials to Business Activities

 •  Create Service Orders

 •  Service Scheduling

 •  Service Billing

Advanced Order Processing

 •  Drop Shipments

 •  Special Orders

 •  Process EDI Transactions

 •  Catch Weight Pricing on Sales Quotes & Orders

 •  Create/Edit Existing Sales Order Import Template

Order Picking

 •  Pick Ticket

 •  Create a Pick List

 •  Select Bin Locations on Orders

 •  Select Lot or Serial Numbers on Orders

 •  Mobile Order Picking

 •  Mobile Pick Lists

Order Packaging

 •  Packing Slips

 •  Packaging Management

 •  Create a Shipment in Packaging Manager

 •  Packaging Shipment in Packaging Manager

Order Shipping

 •  Process Shipments via Shipping Workstation Integration

 •  Shipping with Packaging Manager

Payment Entry

 •  Enter Customer Payments

Order Invoicing

 •  Create Invoices from a Sales Order

 •  Batch Invoices

Credit Memos

 •  Create a Credit Memo

 •  Invoice a Credit Memo

 •  Overview

Edit Customer Window Overview

 •  Update Basic Customer Information

 •  Manage Customer Ship To Locations

 •  Customer Contact Management

 •  Customer Credit Specifications

 •  Product Invoice History for Customer

 •  Customer Orders

 •  Customer Specific Product IDs

 •  Invoice & Payment History for Customer

 •  Sales History, Marketing Information & Webstore Customer ID

 •  Emails Sent from Customer Window

 •  Customer Pricing Rules

 •  Business Activities Related to Customer

Customer List & Credit Management

 •  Customer List

 •  Credit & Collection Features

Create Customers

 •  Create New Customer Manually

 •  Import Customers

 •  Create Customer Jobs

 •  Overview

Receipts

 •  Purchase Order Receipt

 •  Mobile Receiving

 •  Inventory Receipt for Lot Number Split/Product Breakdown

Adjustments

 •  Inventory Adjustment

 •  Inventory Balance Adjustment

 •  Inventory Issue

 •  Inventory Count

 •  Mobile Inventory Counts

Transfers

 •  Inventory Transfer

 •  Mobile Inventory Transfers

Assemblies

 •  Inventory Assembly

 •  Mobile Inventory Assemblies

 •  Assembly Workflow Status Configuration

Landed Cost

 •  Vendor Bill Allocation to Inventory Cost

Track & Trace

 •  Track & Trace Inventory Movement for Lot/Serial Items

Void Transactions

 •  Void Inventory Sessions


Company

  • About Acctivate
  • Branding
  • Privacy & disclaimers
  • Careers
  • Contact us

Community

  • Technology partners
  • Referral program
  • Partner directory
  • Partner program
  • Partner resources
  • Inventory glossary
  • Blog

Features

  • Barcoding software
  • Bill of materials (BOM), Kitting & Assemblies
  • Tracking inventory task activity
  • Catch weight management
  • Credit management
  • Customer management
  • eCommerce inventory management
  • EDI management software
  • Hosted inventory management
  • Import export software
  • Inventory dashboard
  • Inventory forecasting
  • Landed cost
  • Manufacturing
  • Matrix inventory
  • Multi-channel inventory management
  • Multi currency
  • Order fulfillment
  • Order management
  • Pricing tools
  • Process manufacturing
  • Purchasing management
  • Reporting
  • Retail counter sales
  • Service and repair management software
  • Traceability
  • Wholesale distribution

How to buy

  • Learn Acctivate
  • Acctivate Benefits
  • Inventory Module Features
  • Acctivate Onboarding
  • System requirements
  • Free Trial
Connect with us
Acctivate on Facebook Acctivate on Instagram Acctivate on Linkedin Acctivate on Twitter Acctivate on YouTube

© 2022 Alterity, Inc. All rights reserved. ACCTivate! is a registered trademark of Alterity, Inc., registered in the U.S.
Privacy & Disclaimers