Manage Product Components


For products requiring a component list, a Bill of Materials type must be selected. Acctivate supports a variety of manufacturing options, including assemblies (build for stock), kits (build to order), and assortments (matrix).
The following Bill of Materials choices are available.
- Assembly (Standard): An inventoried item created by combining one or more components from raw materials into a finished good. The list of components is static. This requires an inventory assembly session to be posted.
- Assembly (Custom): Same as Assembly (Standard), but with the option of marking components as variable and entering actual quantity used. This also allows the user to modify the components used on the assembly session itself without updating the standard list.
- Assembly (Process): Same as Assembly (Custom), but with the option of specifying a different yield from the build quantity on the assembly session. When modifying the yield, the actual quantity used for components marked as variable will remain the same while non-variable components will fluctuate.
- Kit (Standard): A non-inventoried item created by combining one or more components from your warehouse based on customer orders (build to order or just in time stock). The list of components is static. No additional inventory transaction required to build the item.
- Kit (Custom): Same as Kit (Standard) with the additional option of variability in the components. Users can add and remove components, as well as adjust the Component Quantities for a single Sales Order.
- Assortment: Allows the ability to add a list of components for each option available in this matrix. This is typically used in the garment/shoe industry. The customer orders 100 pairs of shoes and the user entering the order can specify how many of each size and/or style need to be fulfilled.
Depending on the package purchased, some of these may be add-on modules. Contact your sales rep to purchase new modules, if needed.
Adding Components to a Product
- Follow the instructions listed here to create new products or select and Edit the product needing to be updated to enable components.
- In the Bill of Materials field, select the proper option from the list above.
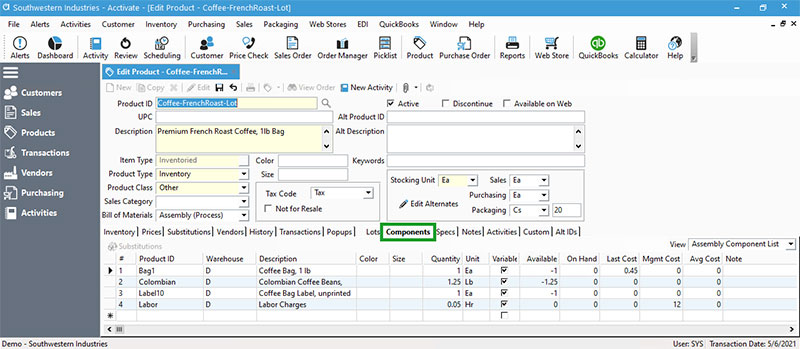
- To assign component, click the Components / Assortment tab.
- Type the sequence number in the # field to set the sort order of the components on the assembly transaction.
- Type the Product ID followed by tab or use the lookup to select the component from a list.
- Choose the default Warehouse you need this component to be pulled from on the session. Users can change when needed on the transaction.
- Specify the component Quantity. This is the quantity used of this component to build one unit.
- If Custom or Process BOM type, check the Variable box for any non-static component.
- Repeat these steps 4-8 for each additional component that needs to be added.
- When all the products have been added to the component list, click the Save button.

Update Existing Component Lists on Product Window
Any changes made to these items will be reflected in new transactions. This will not update existing transactions.
- Navigate to the product needing to be updated:
- Product List > Search and select > Edit.
- Inventory > Edit Product > Type ID followed by tab or look up and select from a list > click Edit.
- Product icon > Type product ID followed by tab or lookup and select from a list > Edit.
- Select Components tab.
- Make updates to list:
- Override sequence # to reset the order of components shown on assembly transaction.
- Choose different default Warehouse from list.
- Update Quantity.
- To delete a component, select the row and press Delete key on keyboard.
- Add new components on row marked with *. This will update to a pencil icon once product selected.
- Save changes when finished.
Update Existing Component Lists via Import
Acctivate includes the ability to import the component lists for products with a bill of materials from above. When importing, you’ll need the following information as columns in a spreadsheet:
- Parent Product ID: The assembly, kit, or assortment product ID. This is repeated down the column for each new component.
- Component Product ID: Product ID for the components which will create the parent.
- Component Warehouse: The warehouse you wish to utilize as a default on the transactions for this component. This is optional field.
- Component Quantity: Quantity used to build one parent. This is based on the stocking unit of both the component and parent product.
- Sequence: Sort order for components. Number each row accordingly.
- Variable: Yes / No value based on whether the component has variation in the process. This is optional.

Importing the component list will clear out existing components for the mapped parent products. It’s extremely important to have the complete list of components included in the import. The full list of steps to import components can be found here. To download an example sheet, click here.


