Creating Invoices from a Sales Order

Creating invoices can be done once an order has been picked, packed, and shipped. Creating invoices is arguably the most important step in order processing as it records important financial information while also removing the shipped inventory from your On Hand quantity.
Creating invoices can be done from the Enter Sales Order window or in batch by using the Order Manager. This page covers creating a single invoice from the Enter Sales Order window. Users have the option to add payment and apply any unapplied payments or credits from this window. Unapplied credits and payments cannot be applied from Order Manager.

Invoice a Single Sales Order
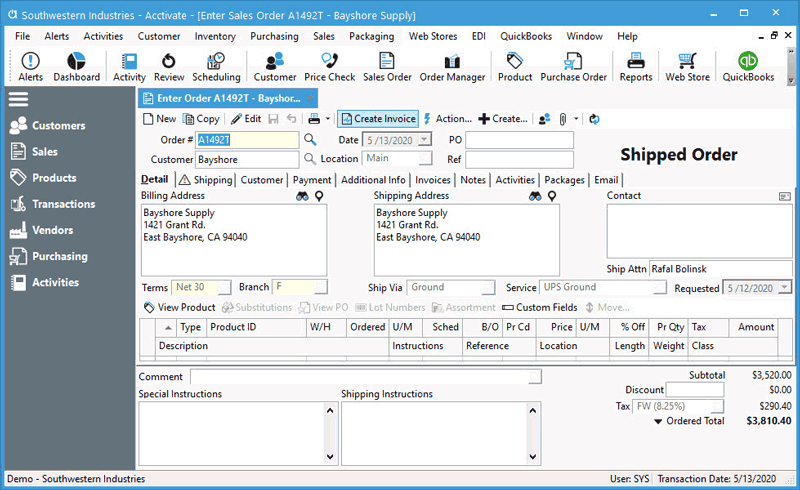
- Locate the sales order and open it in the Enter Sales Order window.
- If the next suggested action is to invoice the sales order then the Next Action button will read Create Invoice; click that button. If the next suggested action isn’t to invoice, but you are able to skip the remaining steps, you can use the Action > Create Invoice.
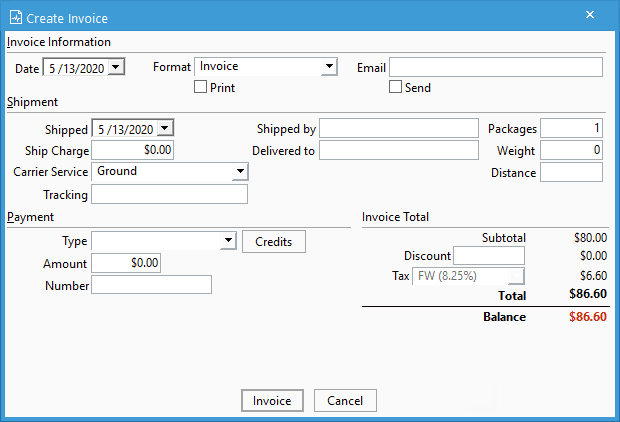
- The Create Invoice window will appear and is comprised of three sections:

- Invoice Information: This section contains the invoice date, print and email options. The Printing and Email options can have their defaults set in the Configuration Manager.
- Date: This is the Invoice Date and will default to the current date. While you can change it, be aware that it affects when the product is removed from inventory.
- Format: Various Invoice formats can be setup. You can use this menu to choose which format you want to use.
- Email: The Email from the contact field of the invoice will populate here. This is the email address that the invoice will be sent to. You can manually change this if you wish.
- Print: If this is enabled, the invoice will be Printed. If selected, you can optionally select the Preview checkbox. These options can be defaulted.
- Preview: Visible when the Print checkbox is enabled. If this is checked, the Invoice will Print Preview.
- Send: If this is checked, the email Invoice window will appear and use the Email address from the Email field above it.
- Shipment: This section will contain fields for you to manually enter in data unless this order was shipped using Acctivate’s Shipping Workstation Integration, in which case you will see the Shipment Information from the Shipping Software. Without the integration, you can manually enter the following:
- Shipped: Date the shipment was shipped.
- Ship Charge: If you enter in a Shipping Charge it will be added to the Invoice total.
- Carrier Service: The carrier’s shipping service.
- Tracking: The carrier’s Tracking Number.
- Shipped by: Text field to record which individual shipped it.
- Delivered to: Text field to record who the shipment is being delivered to.
- Packages: The number of packages in the shipment.
- Weight: The total weight of the shipment.
- Distance: The total distance as a numeric value.
- Payment: Here you can record payment at the time of invoicing. If you had payment information recorded on the Payment tab of the Sales Order, it will automatically populate this section.
- Type: Select the Payment Type.
- Amount: The amount paid. This will show a warning icon if they’ve paid less than the total of the invoice. Clicking the warning icon will update the payment amount to match the invoice total.
- Number: This is the payment reference number.
- Credits: When you click this button, you can see a list of credits available to apply to this invoice.
Note: If you have a payment type that is configured as a credit card and you are integrated with one of our supported merchants, you will have more credit card data fields to enter. Doing the next step in the list will send the CC details to the processor.
- Invoice Information: This section contains the invoice date, print and email options. The Printing and Email options can have their defaults set in the Configuration Manager.
- Click Invoice to create the Invoice.


