Create and Modify Filters on Lists

In this article

Full training library
When looking up records via the left navigation lists, users can create and save custom filters. These filters can be saved for individual or company-wide use.
Filter List Lookup to Save for Future Use
Open any of the Lists from left navigation bar. The steps below cover adding a filter to the customer list, but the same steps apply to all other lists on the same navigation bar.
- Click on the Filter button at the top of the customer list window or use the active filter drop down to select Custom Filter to create a new one.
- The Custom Filter option only allows creating new or applying unsaved filter changes to current selection.
- Click on the ‘+‘ to begin creating your filter.
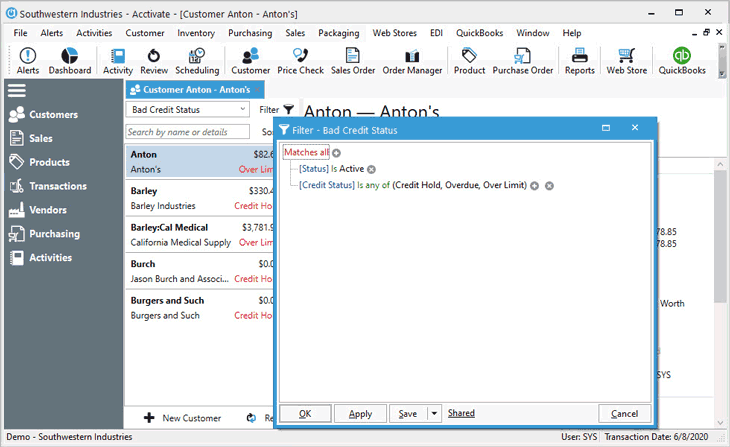
- Click Matches All to change the type of matching, add conditions, add groups, or clear all filters.
- To create a filter to show customers with bad credit status, add Credit Status > Is any of > Credit Hold, Over Limit, Overdue.
- To update the current list of filtered customers, click Apply.
- To save for future use, click Save As.
- Name the Filter.
- If this filter needs to be shared to other users, check the box to make Available for all users. Not checking this option means only the creator will be able to use the filter.
- Save.

Modify Existing Filter or Create Alternate Version
- Select the previously created filter on the specific list window to be updated.
- Click the Filter button.
- Add additional filters, conditions, and groups by clicking the + button or remove any unwanted filter criteria by clicking the x button.
- To create an alternate version of the existing custom filter, click the down arrow next to the Save button and choose Save As. To save changes in existing filter, click Save.
Rename Custom Filter
- Select a custom filter to be renamed.
- Click Filter button.
- Click the down arrow next to Save button.
- Choose Rename Filter.
- Assign New Name.
- Save.
Delete Custom Filter
- Select a custom filter to be renamed.
- Click Filter button.
- Click the down arrow next to Save button.
- Choose Delete Filter.
- Click Yes to prompt.


