Inventory Receipt for Lot Numbers Split/Product Break Down

In this article

Full training library
Typically, an Inventory Receipt is utilized to receive product listed on a purchase order. However, there are times when using a standalone inventory receipt transaction is necessary.
When using the inventory receipt transaction to do things like splitting lot numbers or breaking down one product to create others, make sure to print the session prior to posting to ensure the total value of the session is $0. If not, let your accountant know they need to create a general journal to move the balance out of your purchases account into some other adjustment type account.
Split Single Lot Number into Multiple Lot Numbers via Inventory Receipt

- Select Inventory menu > Receipts to open the Inventory Receipts window.
- Click New to create a new session.
- Select the proper Warehouse record for this transaction.
- Fill in any optional header information, such as Reference, Receiving Document, or Description.
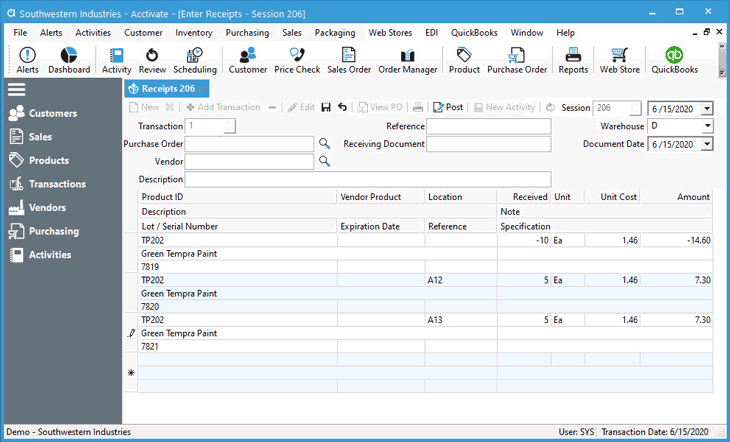
- Add the lot numbered product to be split up by typing the product ID and pressing tab or selecting from the lookup.
- Specify the quantity to be removed by entering a negative Received qty.
- Verify the Unit Cost of the lot number being removed to make sure it’s an exact match.
- If listed in a bin, enter the Location you are removing the lot number from.
- Type the lot number to be removed in the Lot / Serial number field just below the product description. Make sure this is the same lot number originally created.
- Add the same product to the session to add new lot numbers to it.
- Specify the quantity to be added by entering a positive Received qty.
- Verify the Unit Cost matches the unit cost of what’s being removed. If not adding the full qty to the new lot number, make sure the Amount matches the amount from the one being removed.
- If using bin locations, enter the Location the new lot will be stocked in.
- Type the new lot number to be added to the product, as well as Expiration Date, Reference or Specification when needed.
- When adding multiple new lots to the product, continue doing steps 8-11 until all new lots are added.
- Save the session.
- Print the Inventory Receipt register to verify the session amount nets at $0.
- Post when ready. This will remove the original lot qty and add new lots to the product.
Break One Product Down to Add Quantity to Other Items via Inventory Receipt

- Follow the same steps as above through step 4.
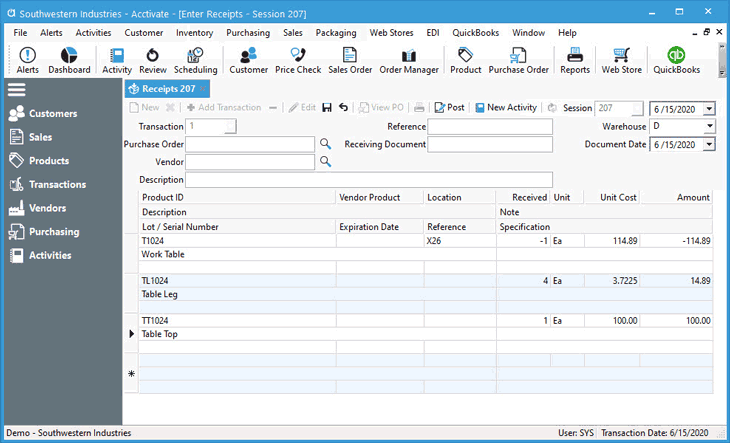
- Add the product being removed from stock by typing the product ID and pressing tab or selecting from the lookup.
- Specify the quantity to be removed by entering a negative Received qty.
- Verify the Unit Cost of the product being removed to make sure it’s an exact match of the current unit cost.
- If listed in a bin, enter the Location you are removing the lot number from.
- If product is a lot/serial numbered item, type the lot/serial number being removed into the Lot / Serial number field just below the product description.
- Add the product(s) being added to stock to the transaction. If these products are stocked in a different warehouse than the one being removed, Save the session and click + Add Transaction to add the other warehouse details. Do this as many times as needed when breaking a product down into multiple warehouses.
- Specify the quantity to be added by entering a positive Received qty.
- Verify the Unit Cost or Amount matches the unit cost or amount of what’s being removed. When adding multiple products to stock, you’ll need to manually calculate the allocation of the unit cost across these items.
- If using bin locations, enter the Location the new lot will be stocked in.
- If product is a lot/serial numbered item, type the lot/serial number being added into the Lot / Serial number field just below the product description.
- When breaking down into multiple products, continue doing steps 5-7 until all products being added to stock are listed.
- Save the session.
- Print the Inventory Receipt register to verify the session amount nets at $0.
- Post when ready. This will remove the product being broken down and adds the products created by this process.


