Selecting Lot or Serial Numbers on Orders


Products on a sales order that are Lot Numbered, Serial Numbered, or Number when Invoiced will require the inventory control number be selected or entered prior to invoicing.
Generally, you would record the lot or serial numbers after the pick has been completed, but they can be selected prior to the picking process. When picking from a Pick Ticket, the assigning of lots prior to or after the picking process is inconsequential.
However, if you are using Picklist and assign the Lot or Serial number prior to creating the Picklists then Acctivate will create a Picking route that will take you to that Lot Number. With Acctivate Mobile, it’s expected that you will pick the lot or serial numbers with the Mobile Device. If you assign lots or serial numbers prior to the Picking with mobile, then you are not able to reaffirm with the device that you have picked the lot or serial number.

Select Lot or Serial Number on Order
- Navigate to the order in question and go into Edit mode.
- Select the order detail line that contains the Lot, Serial, or Numbered when Invoiced controlled product.
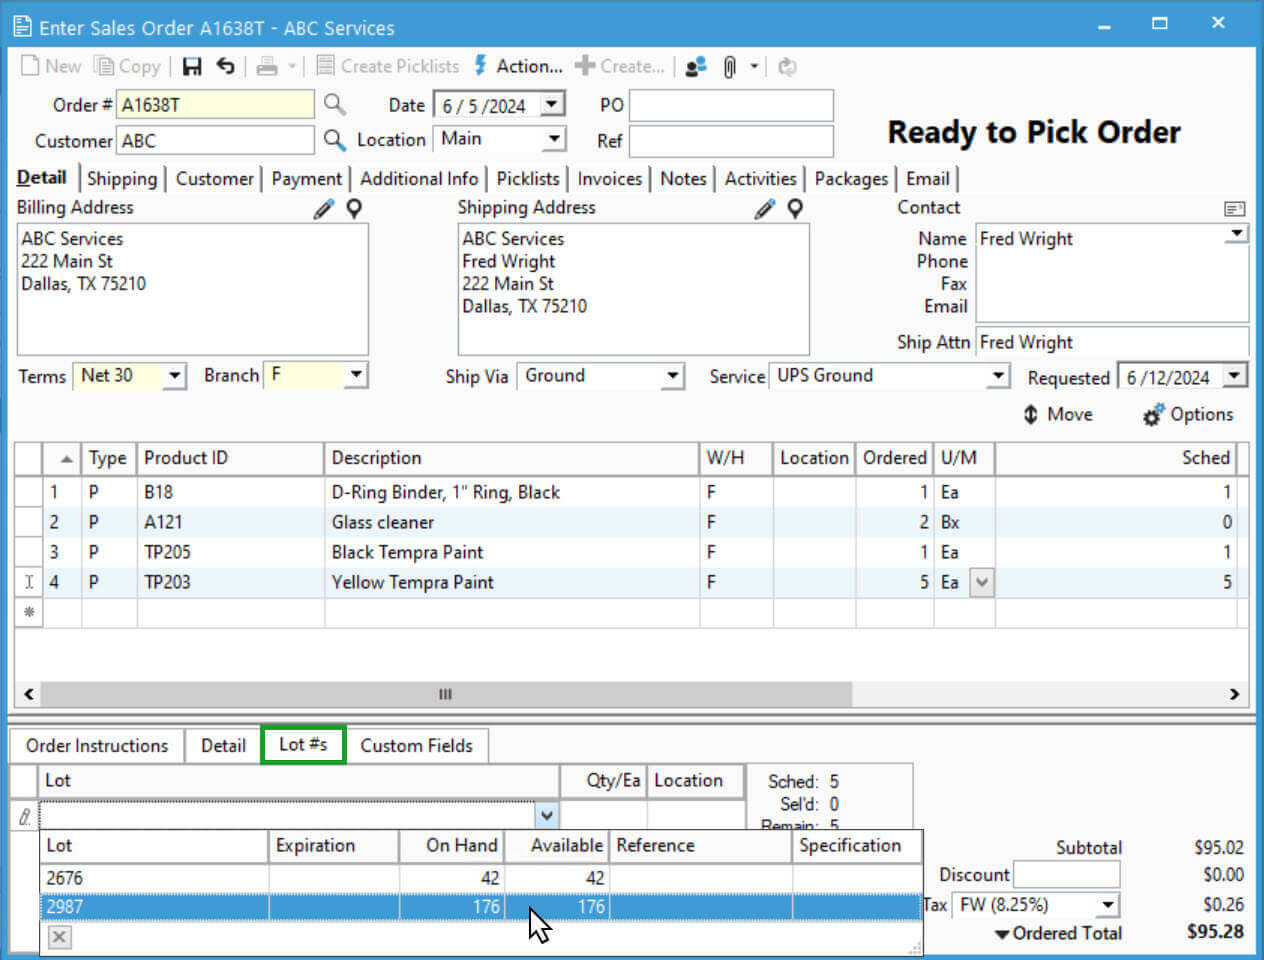
- Below the Order Detail section of the Enter Sales Order window, you will see a tab that reads one of the following:
- Lot #s: This is the text the button will display if the product is a Lot Numbered or Number When Invoiced product.
- Select an available Lot number from the Lot Number drop down menu.
- Type Lot/Serial # into the Lot field for Number when Invoiced products or click Generate #s button:
- In the Numbers section, it will tell you the number of Serial Numbers that are going to be generated, this is based on the Scheduled qty of the order.
- Optionally, enter in a Prefix and a Suffix.
- In the first Numbers data box, enter the beginning number. Tab or move out of that field.
- You will see a Preview of what the serial number sequence will be. For example a Prefix of A, Numbers 1-40 and Suffix of Z would result in a Preview value of A01Z-A40Z.
- Optionally, you can enter in the Reference data which will be associated with each of these serial numbers.
- Click Generate.
- Type Lot/Serial # into the Lot field for Number when Invoiced products or click Generate #s button:
- The Qty will fill in based on the Available qty of that lot or the Remaining qty needing to be selected, whichever is less. You can manually change the quantity.
- If the product is a catch weight priced item you will see a Weight field. Enter in the weight of that lot and qty.
- Repeat the above steps to select additional Lot numbers and quantities for the sales order line until the Remaining quantity shows 0.
- Select an available Lot number from the Lot Number drop down menu.
- Serial #s: This is the text the button will display if the product is a Serial Numbered product.
- Select an available Serial number from the Serial Number drop down menu.
- The Qty will default to 1 and cannot be changed.
- For catch weight items, enter the Weight for the specific serial number.
- Repeat the above steps to select additional serial numbers for the sales order line. You have selected enough when the Remaining quantity shows 0.
- Lot #s: This is the text the button will display if the product is a Lot Numbered or Number When Invoiced product.
- Repeat steps 2-3 until all products requiring a lot or serial number have one assigned. Make sure to complete these steps for all scheduled quantities prior to invoicing.
- Click Save to save your order.
Select Lot or Serial Number on Picklist
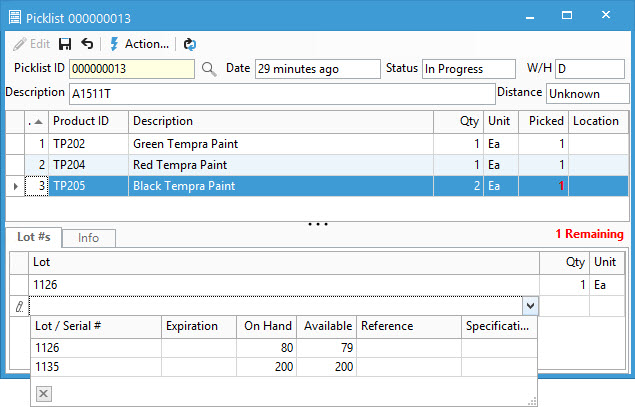
- Open the Picklist in question whether from the sales order or the picklist window. Depending on your picklist defaults, you may see the order picked in full or picked quantities of 0.
- Click Edit.
- Select a row to assign the lot or serial number.
- Choose or enter the lot/serial number(s) in the Lot or Serial # section below the list of items, as well as the Qty picked.
- Continue adding the numbers until all picked qty is assigned for item.
- Repeat steps 3-5 until all lot or serial numbers are assigned.
- Save changes.


