Purchase Order Receipt


When inventory item arrive, you’ll record the receipt in Acctivate. This step updates your quantities on hand, prepares the stock for sale or production, and ensures accurate inventory valuation. Receipts are most often linked to purchase orders, allowing Acctivate to properly reconcile inventory and accounts payable when vendor bills are entered.
Understanding Inventory Receipts
In Acctivate, receipts can be created in a few ways depending on the scenario:
- Linked to a Purchase Order – This is the most common workflow. Items on the PO are received into inventory and later matched to the vendor bill for proper accounting.
- Standalone Receipt transactions – These are useful in specific scenarios, such as:
- Breaking a single lot number into smaller lots
- Splitting one item into other items (break down of a product)
Non-inventoried items cannot be received into stock. These are expensed at the time of vendor invoicing and are not included in this workflow. This page only covers inventoried items.
Partial vs. Full Receipts
By default, Acctivate will attempt to receive all outstanding items on a PO when creating a receipt. If your process requires receiving items in batches or selectively, you can disable this by unchecking the Receive PO in Full option in configuration management.
This gives you control to receive only the items that have arrived, without affecting the rest of the purchase order. You can return later and receive the remaining quantities on a new session.
Ways to Create a Receipt Session
You can begin a receipt in a few different ways, depending on what windows you currently have open. The recommended way is via the Purchasing List:
- Go to Purchasing on the left navigation menu
- Search for and select the Purchase Order to be received. Use filters if needed.
- Choose Receive
This opens the Enter Receipts window with the PO and vendor info pre-filled. It’s the most efficient way to process receipts one at a time.
Other Ways to Create a Receipt
These additional methods may be useful in specific situation:
From the PO Manager
- Use when you want to create a single receipt session containing multiple transactions (e.g., you’re receiving several POs at once).
- Click the PO Manager icon on the icon bar or go to Purchasing > PO Manager, toggle views or buttons based on need, select one or more POs by checking the boxes, and choose Action > Create Receipt.
From the Enter Purchase Order Window
- Open the Enter Purchase Order window and click Receive at the top.
- Useful when you’re reviewing or editing the PO directly before receiving.
From the Enter Receipts Window
- Go to Purchasing > Enter Receipts and click New to start from scratch.
- Best for standalone receipts not tied to a specific PO. If related to a PO, check the Receive against PO option to enter PO number.
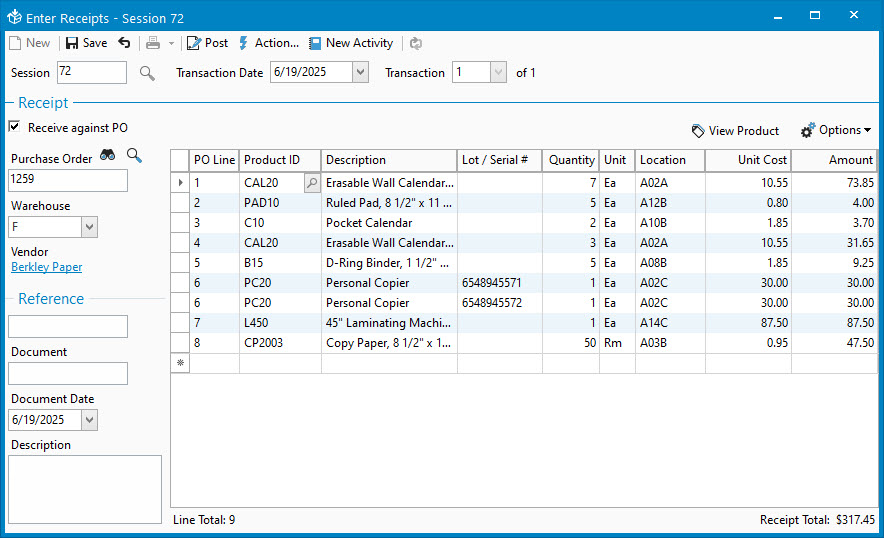
Enter Receipt Details
- Review the warehouse, vendor, and PO information on the left side of the window.
- Fill in any other optional fields, such as Reference, Document, and Description.
- Verify the Transaction Date. The date defaults today’s date, but can be modified. This is the date inventory is added to stock.
- If not receiving in full, add each product to the transaction by typing the Product ID and selecting from the auto-complete list or using the lookup. This only shows items listed on the selected PO.
- Verify the Quantity received for each row. Override to be what you actually received in the shipment. Any products not received on this transaction need to be deleted. Do not update the quantity to be zero.
- When using bin locations, make sure to enter the receipt Location.
- Lot number items require the user to enter the number next to the Description of the item. If needed, users can also add Expiration Date, Reference, and Specification for each lot number listed.
- Serial number items will be broken out to list one unit per row to accommodate all outstanding quantity on the purchase order. Make sure to enter the serial number for each row, as well as any other information listed in the above bullet point.
- Save the session once all details are entered.
- Post the session to add products to stock.

Helpful Actions
Use the buttons across the top bar to manage the receipt:
- Action Menu: add, delete, or split the transaction into its own session, as well as delete session.
- New Activity: Create a business activity related to the receipt session to track notes or attach documents.
- View Product: Opens the product record for the selected line.
- Options: Find searches within the list of items, send the details to Excel, restore the grid settings to defaults, or modify columns shown on screen. Adjusting columns on screen is done by a system admin and affects the everyone’s view.


