Shipment Packaging & Printing with Packaging Manager


Once you’ve created the shipment, you can begin packing the shipment and recording any necessary information prior to shipping. As previously mentioned, newly created shipments will have a default status of Created (unless the customer is an EDI trading partner and their shipments are configured to ‘auto-pack’).
- Start by opening the Shipment Packaging window to proceed with shipment packaging. Go to Packaging > Package Shipments.
- Search for the newly created shipments by clicking the lookup icon next to the Shipment field.
- In the lookup, the created shipments will have a status of “C”. If you are using the Automatic packaging option, your shipment will show as P for packaged. Toggle the field name in the top left corner to change what data point to use for search. The filter in the bottom of the window allows you to look for specific statuses or warehouses.
- There are three tabs in the Package Shipment Window:
- Shipment: This tab shows the Ship to Location and orders included in the shipment.
- Carrier: This tab includes carrier routing information, total order weight and number of pieces and delivery contact information.
- Routing Section:
- Carrier: This menu shows carriers which are setup in configuration manager with an SCAC code.
- Carrier Service: This is the list of carrier services available for the selected carrier.
- Transportation Type: Options are configured for EDI Trading Partners. Common examples are Air, Motor, Private Carrier.
- Carrier Reference: This is a user defined reference number that can be used to identify the shipment (in addition to the unique auto assigned shipment number).
- Bill of Lading: If a carrier issues a Bill of Lading (a document detailing the shipment. Typically used by the Carrier to confirm receipt of shipment) then you can enter that number here.
- Routing
- Quantity and Weight Section:
- Packaging Code: The default is pieces. This can be configured depending on your EDI partner’s requirements.
- Weight (Lb): This will calculate based on the sum of the weight of the cartons, however you can manually update this.
- Number of Pieces: This will calculate based on the sum of the quantity of the cartons, however you can manually update this.
- Delivery Contact: The Contact Name and Contact Number come from the contact section of (the first) order included in the shipment. You can change this if necessary.
- Routing Section:
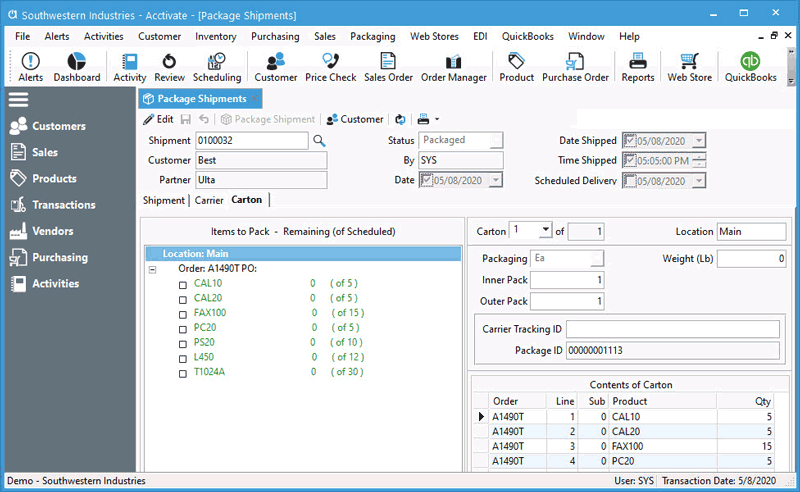
- Carton: The Carton tab shows the items to be packed on the left and the carton information and contents on the right. Some noteworthy fields:
- Carton # of #: This allows you to quickly move through cartons.
- Packaging: This is the Packaging description for display purposes. Typically options are setup depending on Trading Partners requirement. Common examples are Pieces, Carton, Pallet, etc.
- Weight: This is the weight. This will populate based on the weight defined in the Specs tab of the Product(s) that are included in the package. This must be greater than 0.
- Inner Pack: This will populate based on the Inner Pack defined in the Specs tab of the Product(s) that are included in the package. This must be greater than 0.
- Outer Pack: This will populate based on the Outer Pack defined in the Specs tab of the Product(s) that are included in the package. This must be greater than 0.
- Carrier Tracking ID: This is where the Carrier’s Tracking Number is entered. If Acctivate is integrated with a supported Shipping Software, this will update automatically once shipped. Otherwise, you can manually record the Tracking Number here once you have the tracking number.
- Package ID: This is the uniquely generated identifier for a package. If you have completed the prerequisite configuration, this number will be the SSCC-18 number used by your EDI Trading Partner.
- Once everything is packaged, set the Status to This is done by either manually packing the items into each carton or using one of the options below.

Shipment Packaging Options
You can manually pack the items or you can use the Package Shipment button at the top of the window to automatically pack a shipment.
Auto Package Shipment
Click Edit and then click the Package Shipment at the top of the window. You will be given three options:
- By Product Packaging Unit: If your product is stocked in one unit but your packaging unit is a different unit, you can choose to automatically package based on the Packaging unit. However in some instances there may be additional units that need to be handled. For example, let’s say product “B10” is stocked by “Ea”, but packaged by the “Dz”. There are 12 Ea in a Dz. A customer orders 27 Ea. The following options will handle the ‘additional units’ differently.
- One Carton: This will put the additional quantities into a single carton. This results in three cartons; carton 1 = 12 Ea, carton 2 = 12 Ea, carton 3 = 3 Ea (the additional units).
- Even Distribution: This will balance the quantities evenly. Using the above example, we know we need at least three cartons, but rather than have the first to filled to the max and the third one mostly empty, Acctivate will shift the quantities to be equally distributed; carton 1 = 9, carton 2 =9, carton 3 = 9.
- Stocking units: This will put each additional unit in it’s own Carton. This results in five cartons: carton 1 = 12 Ea, carton 2 = 12 Ea, carton 3 = 1, carton 4 = 1, carton 5 = 1.
- By Store Location: EDI orders have the ability to have a single Ship To Location that is different then the final destination. For example, your trading partner may want 5 orders shipped to a Distribution Center (the Ship to Location), but each order needs to be ‘Marked for Store’ which is the final location. If your EDI partner follows this model, all products will go into one carton per store location.
- One Carton: This will put all products in the shipment into a single carton.
Manually Package Shipment
You can also manually choose which products go into which cartons. This is commonly known as Pick and Pack.
- In the Items to Pack pane, click on a product and drag it to area below Contents of Carton. If there is a kit item on the order, you can drag the kit Product ID to the carton which will bring all the components into that carton as well, or you can drag individual components.
- If an item is barcoded, you can use a USB barcode scanner to record the pack. Place the cursor in the Product field below the Items to Pack section. Scan the barcode which will add a qty of 1 to the current carton.
- Add Cartons: Once you’ve packaged a carton and need to add another, click the Add button at the bottom. Likewise, you can Delete a carton if necessary. If you don’t want to Delete the carton, but you want to empty the entire contents, click If you want to unpack a single item, click on the item and then click Unpack.
Print Shipping Documents for Shipment Packaging
With the package selected, use the printer icon to print out a Packing List or a carton label for the shipment. When using UCC-128 labels with Acctivate, print from the Packing menu > Print Export Shipments.
Print Pack List or Carton Label for Shipment / Carton from Packaging Manager
- Open Package you’re needing to print label for, if not already opened.
- Click printer icon to print the default form or use the down arrow to choose between Print Pack List for Shipment / Carton or Print Carton Label for Shipment / Carton.
Print / Export Shipments from Packaging Menu
- From the Packaging menu, choose Print / Export Shipments.
- Choose the Print or Export option.
- Select the Report you wish to print.
- Choose a specific or all trading partners.
- Users have the option to print newly created shipments or reprint previously printed shipments.
- Check Preview box to see a preview of what’s to print.
- Click OK.
- Once finished, you have the option to Finish the process, Restart, or Cancel.
- Clicking Finished will update the shipments as printed in the database.


