Filter and Organize Activities with Business Activity Manager


The Business Activity Manager gives you a quick way to view and update groups of Business Activities all in one place. Think of it like your activity dashboard. It’s great for staying organized and making bulk updates fast.
You can open it by going to Activities > Business Activity Manager or by clicking the Activity Manager icon on the icon bar.

Bars and Buttons
The Activity Manager is made up of Bars and Buttons:
- A Bar is a group of related Buttons
- A Button shows a list of Activities that match a specific condition (like Activities assigned to you, or ones that are still open)
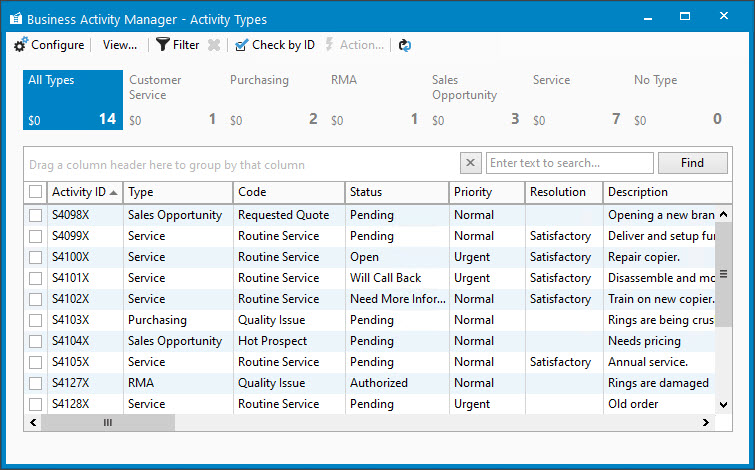
Click View at the top of the window to switch between bars. You’ll see a list of available bars, including a few defaults plus any custom ones your team has created. The default bars include:
- My Activities: Shows what’s assigned to you or unassigned
- Activity Types: Groups by type (like Support, Install, etc.)
- Activity Statuses: Groups by status (Open, In Progress, Completed)
Each Button displays the following:
- A name, describing the type of Activities included
- An activity count, showing how many Activities are in that group
- Sometimes a dollar amount, summarizing total estimated or unbilled values (if used in your workflow)
When you click a Button, you’ll see a list of matching Activities in the grid below based on the selected filters.
Viewing and Organizing Activities
Once you’ve clicked a Button and are viewing a list of Activities, there are several ways to find and organize what you’re looking for:
- Search – Open the Find Panel by selecting View > Find Panel or use Ctrl+F. Type in a keyword to filter the list.
- Group – Open the Grouping Panel by choosing View > Grouping Panel or use Ctrl+G. Drag column headers into the panel to group Activities by that field (like Status or Assigned To).
- Sort – Click a column header to sort by that column. Sort multiple columns by holding Shift while clicking the header.
- Rearrange Columns – Drag and drop column headers to change the order they appear in the grid.
Search and group settings will reset when you switch Buttons or close the Activity Manager. However, column sort order will be saved the next time you use that same Button.
Performing Actions
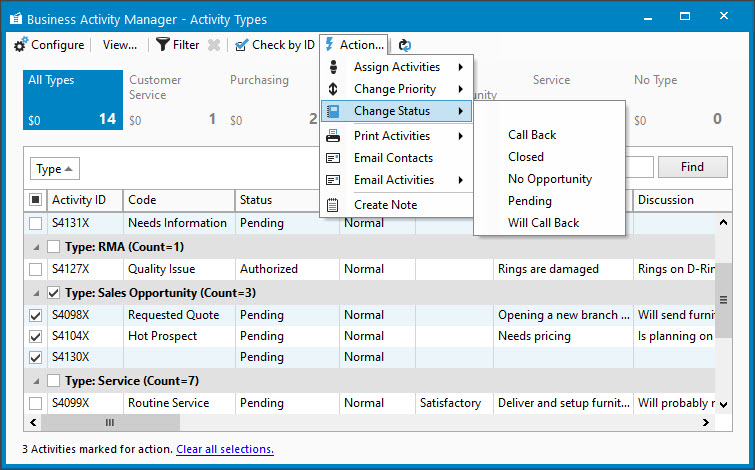
This tool is perfect for managing multiple Activities at once. To perform actions to the list, use the following steps.
- Open the Business Activity Manager
- Toggle the View to the right bar and button based on your needs
- Check the boxes next to each Activity you want to update
- Click Action…
- Choose from the following:
- Assign Activities
- Change Priority
- Change Status
- Print Activities
- Email contacts
- Create a Note

Tip: Activities stay selected after the first action, so you can keep going. But if they move to another button (like from “Open” to “Completed”), just click that new button to find them again.


