Create a New Product

Full training library
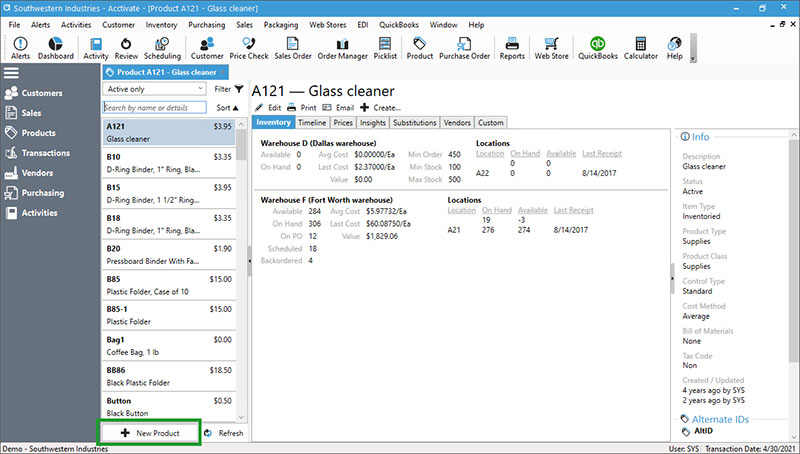
Creating products in Acctivate can be done from multiple areas. All of which end up in the Edit Product window. To get here, the following options exist:
- Products list > New Product
- Product icon
- Inventory > Edit Product

The first option opens the Edit Product window with the New button already clicked for the user to begin entering data. Options 2 & 3 require the user to click the New button or press CTRL+N. Based on the defaults for new products in Configuration Management, some of the required fields will auto-populate. Follow these steps to enter the required fields for a new product:
- Enter the unique Product ID for this item. This field can be updated regardless of posted transactions, if needed.
- Type the full Description. This will show on all the standard forms and some reports, as well as used in a search.
- Select the proper Item Type from the list. The options are as follows:
- Inventoried: Tracks quantity on hand and shows full list of active cost methods.
- Non-inventoried: Quantity tracking not required for products like office supplies, kitted products, assortments. Cost methods available for use on these products are Standard and None.
- Other Charge: Fees to the customer for invoicing.
- Labor: Employee time spent in manufacturing or servicing processes. When needing to assign an internal cost, make sure to set the Standard cost per warehouse.
- Shipping: Allows you to set the default product in the configuration manager and separate freight in reports.
- Drop Ship Only: Vendor always ships directly to the customer. These items will never touch your warehouse.
- Special Order Only: Inventoried items only purchased when listed on a Sales Order. These cannot be ordered for normal stock.
- Select a Product Type from the list. This list setup in configuration management and used to aid in filtering the product lookup window. If no secondary level exists for categorization, set to a miscellaneous product type.
- Choose the proper Product Class. This is the main way to categorize products in Acctivate. Product Class is a list maintained in configuration management which is used for sales invoice detail sync, filtering the product lookup window, and a major group on many standard Acctivate reports. It is also most commonly linked to sales and cost of goods sold accounts.
- Verify the proper Control Type is selected. This tells Acctivate if/when you need to assign a lot or serial number to transactions. Standard means no lot or serial number will be required for any transaction.
- Review the Cost Method assigned and adjust as needed. For inventoried items, Acctivate needs to know how to assign cost of goods sold to the sales invoices.
- Select the proper Stocking Unit. This is the unit the employees would use to count the product. When being utilized in an assembly product, this is the unit used for the component quantity.
- Click Add Warehouse to specify which warehouse(s) should be assigned to this product. Repeat this step until all possible warehouses are assigned.
- Fill in any other fields necessary.
- Save when done.
A few suggested fields to consider:
- Available on Web: Any item you wish to send item availability back to your webstore via the webstore integration.
- Keywords: Aids in global search for product lookup
- Tax code: If this product is ever taxable, mark it as such. Customer tax status will override product tax status on sales orders. The Not for Resale option will charge tax to non-taxable customers.
- Bill of Materials: If this product needs a list of components, choose the proper option based on your need.
- Management tab to the right of warehouse list: Min Stk Qty, Max Stk Qty, and Last Cost.
- Prices: Assign a List Price. This is typically the highest price or percent over cost you charge customers.
- Vendors: Select the suppliers you order this product from. Each vendor can have its own vendor product ID, price, and lead time. When you need to specify a preferred vendor, check the Pref box.
- Alt IDs: Assign alternate product IDs to the item. This includes webstore specific alternate ID’s, UPC, and any other possible alternate product ID. Any Alt ID or UPC type marked as Primary will show on the main product window.


