Create Sales Orders in Showroom from Acctivate Mobile Order Entry

Full training library
With Acctivate Mobile Order Entry, users can walk around a showroom with a customer and scan items to add to a sales order. You have the option to create or modify an existing order to be submitted for the fulfillment process. If creating a new order, the default Order Status will be used. Invoicing can only be performed in the Acctivate desktop app.
Make sure to review the Order Showroom configuration options prior to use.

Order Entry with Acctivate Mobile
- From the main menu on Acctivate Mobile, select Sales Order.
- Click Order Entry.
- Select the Warehouse that is to be used for the order detail line.
- Choose to from these two options:
- Create a new sales order: Enter the Customer ID or use the lookup to select a customer. If this is a new customer, leave the field blank. The new customer will need to be created in the desktop app and added to the order prior to invoicing.
- Open an existing order: Scan, type, or select the Order Number in question to open for modification.
- Press the right arrow below the Order Number field to move to the next screen.
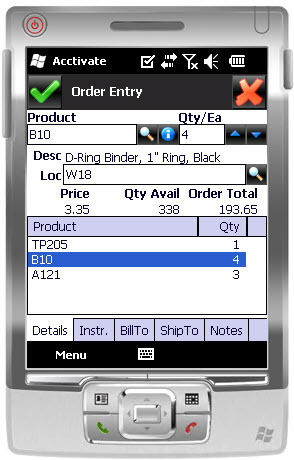
- The user can add products, update quantities, and delete lines from orders in the Order Entry screen.
- Add: Scan product barcode or use the lookup to select a Product. Each scan will increase the quantity, or you can change the Qty using the touchscreen and keypad. Press Enter on the device to save the product as an order line.
- Update: Select the row needing to be updated to modify Qty ordered, lot number, and/or location details.
- Delete: If you need to delete a line, click on a line item and then press the Menu button; then press Delete line.
- Select Lot/Serial Number: When an item requires a lot/serial number, the person entering the order can select it by clicking the # button next to the Qty field. This is optional when creating the order.
- For customers utilizing bin locations, you can scan a location barcode, enter the value in the Loc field, or use the lookup to select from a list. This is optional when creating the order.
- Below the order details, you’ll see a list of tabs. Users can update the shipping instructions, bill/ship to address, and add notes to the order.
- When finished entering or updating the sales order, click the green checkmark in the top left-hand corner to submit the order.
- The Submit Order? Screen will open with the option to Add/Update the customer ID and Print Order. Mobile printing must be configured to print the order from Acctivate Mobile.


