Purchasing List


The Purchasing List provides a centralized view of all purchase orders in Acctivate. this list makes it easy to review, filter, and take action on purchase orders without opening the full Enter Purchase Order window.
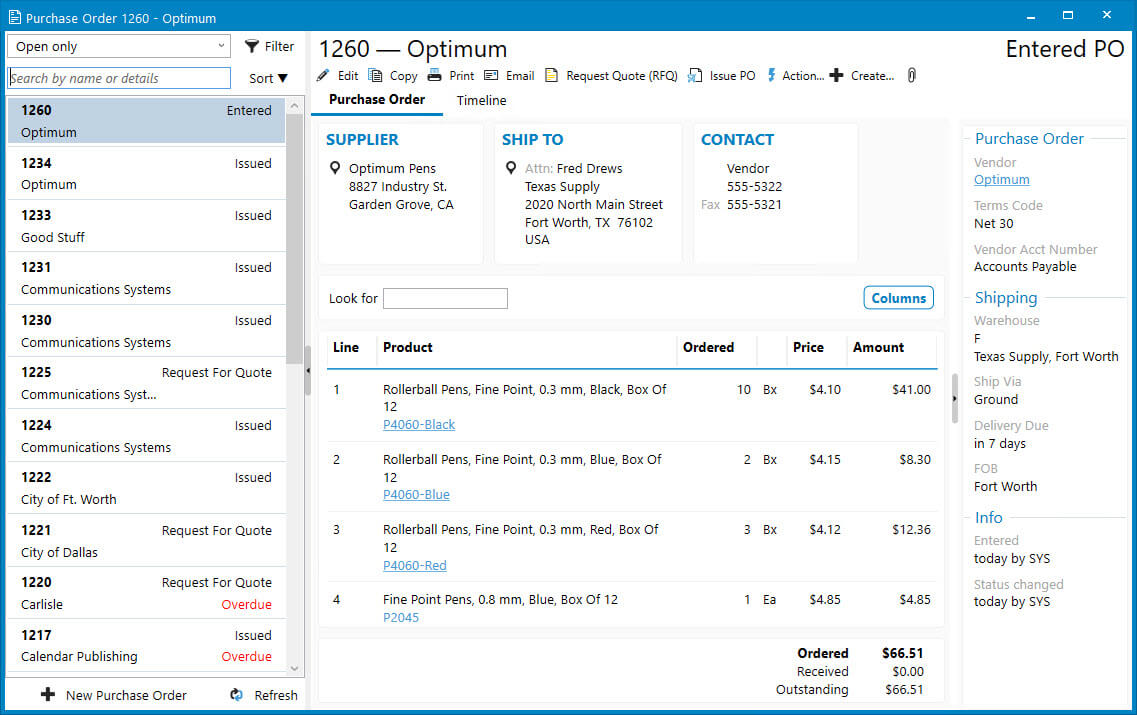
To open the Purchasing List, select Purchasing from the left navigation menu in Acctivate. The window is organized into four main areas:
- Search Bar, Sort, and Filters
- Available Actions
- Purchase Order details, Timeline of activities, and Custom field data
- Informational sidebar
Search, Sort, and Filter
At the top left of the Purchasing List, use the Search bar and Sort button to refine the list. The search is dynamic. Entering a few digits or letters will narrow the list in real time based on the following fields:
- PO number
- Supplier name, city, state, zip, or country
- Related drop ship sales order number
- Status (“Overdue”, based on the purchase order’s requested date)
Click the Sort button to change how the results are ordered. The arrow indicates ascending or descending.
Each line in the list shows key information: the PO number in bold, vendor name, PO status, and a red Overdue tag if the requested date has passed.
Filters to Narrow the View
Above the search bar is a filter drop-down. By default, Open Only is selected, but you can choose other saved filters or create your own for more specific results.
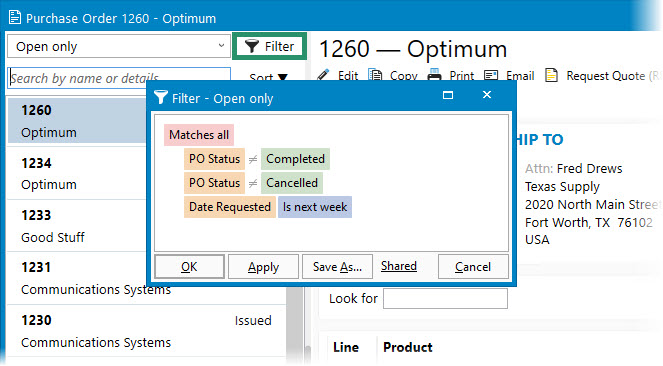
To create a custom filter:
- Click Filter
- Hover over Matches All text and click +
- Select Add Condition
- Click the Approved By box to select from the list of available fields
- Adjust the filter type by clicking = to choose from the available filter types (e.g., is next week, is any of, etc.)
- Enter Values
- Adding Date Requested with the is next week filter to the default of Open Only shows you a list of open PO’s with requested dates next week.
- Choose:
- OK to apply temporarily
- Apply to preview changes with the editor still open
- Save As to crate a reusable filter with a custom name (and choose whether to share with other users)
Quick Actions on Purchase Orders
When you select a purchase order from the list, its details appear in the middle pane of the window. This read-only view lets you review the order without opening it:
- Edit – Opens the PO in the Enter Purchase Order window for updates
- Copy – Duplicates the selected PO (not available for Drop Ship or Special Order POs)
- Print – Prints the default purchase order form
- Email – Opens the email window to send the PO as a PDF to the vendor
- Next Action Buttons – Perform the next step in the purchasing process like approving the PO, receiving stock, or creating the purchase invoice
- Action – Perform other actions like printing labels, changing status, or canceling the PO.
- Create – Link a new business activity or add a note
- Paperclip – Click to add attachments to the order which are saved in one of the File Storage integrations
These actions apply to the selected PO. To update multiple POs, use the Purchase Order Manager.
Viewing the Purchase Order Details
Below the action buttons are three tabs: Purchase Order, Timeline, and Custom (if applicable).
- Purchase Order tab – Displays header information, addresses, and PO details like products, quantity ordered, price, and amount. You can search this section with the Look for box or adjust columns shown on screen with the Columns button.
- Timeline tab – Shows activities linked to the PO, like receipts, purchase invoices, notes, and emails. Use Type and Look for filters to narrow the view. Hover over items to edit using the pencil icon or open by clicking the hyperlinked text.
- Custom tab – Appears when custom fields are in use and displays values from the PO’s Additional Info tab.
Informational Sidebar
The right sidebar shows a summary of key information:
- Purchase Order – Vendor, PO status, date entered, and issued date
- Shipping – FOB, requested date, promised date, and ship via
- Info – User activity, such as who entered or last updated the PO
This gives a snapshot of the PO’s status, key dates, and responsible users. To gain more room on screen, this can be toggled to be hidden or shown by clicking the arrow in the middle.

