Creating Multiple Service Orders with Activity Billing Wizard

After adding time and/or materials to a Business Activity, users can create bulk service orders via the Business Activity Billing Wizard for activities with a Primary Related Item of a Customer or Customer Location. Typically, the Business Activity is used to track Time and Materials and then at the end of predetermined period, for example at the end of the month, Service Orders are created. This process also adds the newly created Service Order(s) to the Related Items section of the Business Activity.
When Service Orders are created using the Activity Billing Wizard, all the selected Time and Materials for the customer ship to location will be consolidated into a single Service Order and marked as Billed. This process sets any labor items marked as N/B (no bill) to billed but will not add them to the order. Materials are treated differently than normal items listed on sales orders. It’s assumed that they were used as part of the service performed and therefore the full Qty Ordered from the Activity is Scheduled on the sales order, regardless of availability.
Typically, these Service Orders can be invoiced immediately. Other than the above mentioned behavior, Service Orders have the same attributes and functionality as Sales Orders and can be Invoiced the same way, however there are two Order/Invoice Formats available:
- Service Order/Invoice
This lists the Time and Materials in the sequence they are listed on the Service Order with a single Total at the bottom. - Service Order/Invoice (Time and Materials split)
This format lists and totals the labor charges, then lists and totals the material charges, then gives a grand total at the bottom.

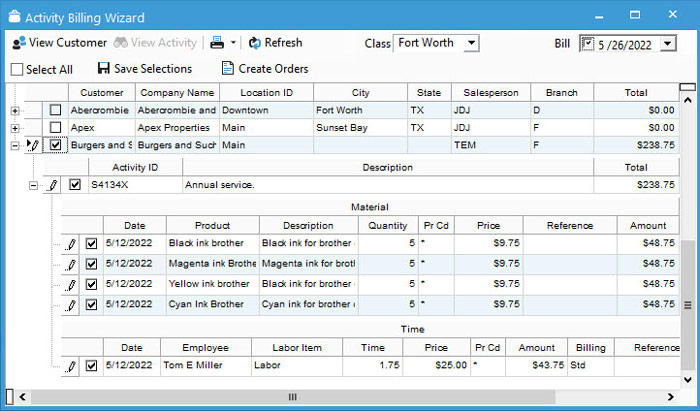
Using Activity Billing Wizard
- Select Activity Billing Wizard from the Activities menu at the top of Acctivate.
- You will see a row for each Customer and Location ID combination. Select the customers you are billing by using the Select All checkbox or check each customer you want to include. If the primary related item is a customer, then the customer’s default location is used.
- To pick and choose individual lines to bill, use the + icon to expand the tree next to the customer’s name to see the Activities related to them and choose to select or unselect specific activities, time, and/or materials.
- You can assign a QuickBooks Class to the Service Orders you are about to create by choosing a Class at the top of the window.
- Select the Bill date. All Time and Materials with a date up to and including this date will be included. When entering time on a Business Activity you can specify the date, but the date for Material is based on when it was added to the Activity.
- Once you’ve made your selections, click Create Orders. You will receive a message that Service Orders were successfully created, and the billing wizard will close.


