Ship To Address & More for Ship To Locations


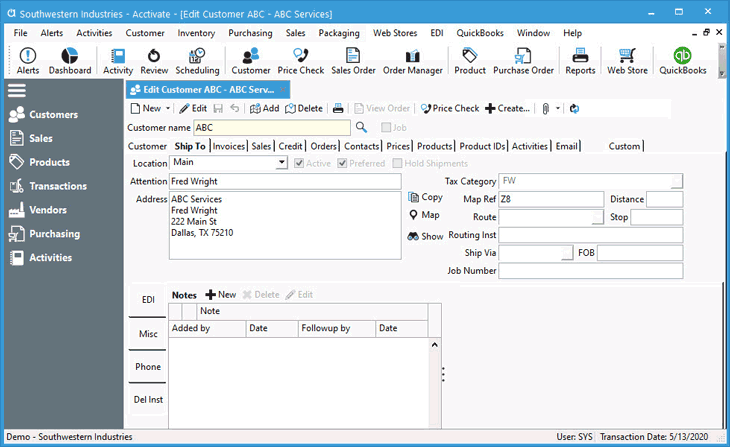
Each customer may have one or multiple ship to locations that include a ship to address and more. The Ship To tab on the Edit Customer Window is where users manage those customer ship-to locations, as well as the Tax Category (or rate) and any location specific information.
Each location will have a unique ID within the customer record. It allows users to distinguish between multiple ship to locations when entering sales orders. To set the default ship to location ID and tax category for new customers, follow the instructions listed here.
The Location ID is how you will distinguish between each unique ship to address for each customer. Many Acctivate users utilize the Store Number or City, State as their Location IDs. You can name this field however you see fit. Each location will have its own ship to address, Tax Category, Ship Via, FOB, etc.
Managing Each Ship To Address on Edit Customer Window
The list of customer ship to locations can be created or modified on each customer record manually or in a batch via an import. Click here to learn how to import multiple Customer Ship-To Locations.

Create New Ship To Location
- Open the Edit Customer window for the customer needing additional ship to locations.
- If opened from the Customers List by clicking Edit, click Save before moving forward.
- Select the Ship To tab.
- To create a new location, click the Add button.
- Assign a Ship To Location ID in the Location This ID enables users to find and select on Sales Orders.
- Add Attention when applicable.
- When adding ship to address details, be sure to click the Edit button to the right of the Address block. This gives you the ability to enter values into specific fields and ensures the proper format is utilized.
- Enter the ship to address details.
- Click OK.
- Make sure to select a Tax Category on each location. This tells Acctivate how to calculate the sales tax on the sales order and invoice windows. Tax Categories are maintained in QuickBooks. Check out this article for specifics on how the rates are setup.
- Enter all other pertinent information in the other available fields. See full list below.
- Click the Save button.
- Repeat steps 3-9 to create each additional location when entering multiple at one time.
Modify Existing Ship To Location
- Open the Edit Customer window.
- Click Ship To tab.
- Select Location from drop down.
- Click Edit.
- Update all necessary fields.
- Save changes.
Delete Ship To Location
- Open the Edit Customer window.
- Click Ship To tab.
- Select Location from drop down.
- Click the Delete button.
- Choose Yes when prompted to remove from the list of locations for the customer.
Available Fields for Customer Ship To Locations
- Status: Check Active to allow users to select on documents. Uncheck to make the location inactive.
- Preferred: Set as preferred ship to location when creating Sales Orders on the fly.
- Hold Shipments: When the need exists to hold shipments to a specific location for a set time, check this box to set begin and end dates.
- Tax Category: When charging sales tax, the most important field to select is Tax Category. This tells Acctivate how to calculate the tax amount on orders and invoices. Tax Categories are set up and maintained in QuickBooks.
- Map Ref: notes on map references for this location.
- Distance: Notes on setting the distance away for this location.
- Route: The route associated with the customer ship-to location as defined in the configuration manager.
- Stop: The stop number on the specific route selected in the above drop-down.
- Routing Inst: Routing instructions.
- Ship Via: Set the shipping method form pre-configured types set in the configuration manager.
- FOB: Set information (from configuration) regarding “Free on Board” location, which is the point at which the customer takes ownership of the product.
- Job Number: Set default job number status here.
Additional Tabs Along Left-Hand Side of Ship To Location Entry
EDI
When utilizing EDI sales transactions, a need can exist to setup ship to locations as distribution centers or to assign the location to a distribution center. This is specified here, as well as default warehouse assignment for sales order details.
Misc
Add a ship to location specific note. This shows on the Shipping tab of the Sales Order window. It can also be setup as a pop up note to show on screen when the user selects the ship to location.
Phone
To setup the shipping contact information, add the Phone, Fax, Email, etc. information on this tab. This will show as the default contact information when ship to location utilized on sales orders.
Del Inst
Set the default Delivery Instructions via the Comment, Shipping Instructions, and Special Instructions fields for each ship to location. Each field conveys different information and is shown or hidden on certain order processing forms.
- Comment: Comments can be pre-defined in Configuration Management or added manually in this field.
- Shipping Instructions: The Shipping Instructions field can be used to convey instructions that are specific to the shipment of the order. For this reason, these instructions print on all the forms leading up to the shipment of the sales order (i.e., Order, Pick Ticket, and Pack List).
- Special Instructions: Internal Instructions for processing the order. These are printed on the Pick Ticket form.
Notes
Users can create notes on the specific ship to location. The notes can have a follow-up user defined (themselves or others) with a specific date/time. Check out this article on how to establish reminders.


