Update Basic Customer Information


To modify existing customers, you’ll need to navigate to the Edit Customer window. Users can open the Edit Customer window through many methods. The three main ways to open the window are as follows:
- Select the Customer from the Customer List to see overview > Edit to open the Edit Customer Window.
- Click the Customer Icon on the Icon Bar.
- From the menu bar, select Customer > Edit Customer.
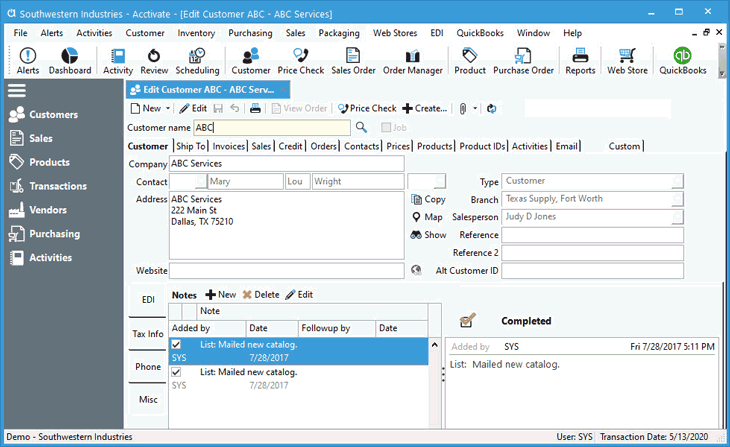
When on the Edit Customer window, users can manage customer information or add New customers. The Acctivate Customer window has many tabs and sections for updating all customer information. The first tab shown is where you maintain the basic customer information which syncs back to QuickBooks. To update, make sure to click Edit when opening the window outside of the customer list. This page covers the information listed on the Customer and Custom tab of the Edit Customer window.

Customer Tab
The Customer tab holds all the basic customer information. The Customer Name (ID), Company name, Billing Address and Contact, and website information. When utilizing multiple currencies for receivables, you’ll also see a Currency drop-down. The currency cannot be changed once orders, invoices or payments have been processed for the customer.
To the right of the basic info, users can also assign a Customer Type, Branch, Salesperson, and Alternate Customer ID. The Reference and Reference 2 fields are fields that you may enter any data into for additional things you may keep your customers categorized by. All the fields above minus the reference fields, branch, and alternate customer ID will update the related customer record in each system via the sync.
Customer Types
Customers in Acctivate can be categorized in different Types. This section will cover how to create new Customer Types and how to assign them to Customers, as well as some ways that the Customer Type can be used in Acctivate.
Customer Types are maintained in both QuickBooks and Acctivate. The sync process updates the list in both systems. In Acctivate, any user with admin access can update the list in Configuration Manager. They can update the type active status or even add new ones to the list. This is a great way to distinguish between a Retail, Wholesale, or Government customer. It’s also a way to separate your customer list into Customers vs Prospects.
Once the list is defined, the Customer Type is then assigned to each Customer in Acctivate. Any customers with a type defined in QuickBooks will already have one set but can be updated in Acctivate. A few use cases for customer type are as follows:
- Filtering customer reports: The Customer Type can be used to filter results on different Reports. When Customer Type is available in the views listed on the report setup, users can add it as a Selection Prompt to narrow the results. Adding additional filter criteria does not add the new filter onto the report itself. It simply gives the user another way to filter the results being shown.
- Narrow results for mailing lists: Customer Types are an available selection to narrow the results when creating a Mailing List in Acctivate.
- Selecting customers for Broadcast Emails: When preparing to Broadcast Emails to a group of customers, the user can filter on specific types. This would be useful when distinguishing between customers and prospects as each would potentially be a different audience requiring alternate information.
- QuickBooks Class Tracking: Assign QuickBooks Classes to Customer Type list to see information from the Sales Invoice Sync Class reports in QuickBooks.
Branch
In Acctivate, the Branch assigns which Accounts Receivable account is utilized on the Sales Invoice. They also give you a way to default a warehouse for use on Sales Orders for each customer. Alternate branches are setup for different use cases:
- Separating Accounts Receivable accounts for financial reporting: Each distinct AR account would have its own branch. Customers do this to separate things like in house sales vs ecommerce.
- Different physical stores customers walk in to purchase: Creating different branches for this case not only allows for the use of separate AR accounts, but also the ability to assign default warehouse to each store location to sell out of.
- Multiple customer currencies: When a customer pays in an alternate currency, the AR account needs to utilize the specific currency. This triggers QuickBooks to assign the Gain/Loss on exchange for the related transactions for customer payments.
- QuickBooks Class Tracking: Assign QuickBooks Classes to the Branch to see details on Class reports in QuickBooks.
- Different intercompany departments: Separate receivables from service, cash customers, and installation. This also ties back into QuickBooks Class tracking when the Classes are setup as departments.
If no Branch assigned to the customer, users will be prompted to select this information on the Sales Order before saving. The use case for this remains intercompany departments when one customer doesn’t fall under a specific category as a default.
Salesperson
When a customer purchases through a specific salesperson, you can assign a default sales rep to the customer window. This will, in turn, default the salesperson on new sales documents. Keep in mind, users can still update the rep listed on the sales documents, if needed. Also, customers created in QuickBooks with an assigned sales rep will sync over to Acctivate with the assignment intact.
The Salesperson list itself is solely maintained in QuickBooks. When needing to update or add to the sales rep list, users must make this change in QuickBooks and then run a synchronization with Acctivate.
Additional Tabs Shown on Left-hand Side of Customer Tab
EDI
When utilizing EDI Sales, the need exists to assign the EDI Trading Partner to the customer record. This tells Acctivate which customer(s) the trading partner documents should be linked to upon import. Acctivate customers can be linked to EDI Trading Partners in multiple ways. This decision is mostly based on how you would like to segregate customer sales orders, invoices and payments for the trading partner.
- One Customer, Multiple Ship-To Locations
The Trading Partner can be linked to one Acctivate Customer with multiple Ship-To Locations. This is the most common EDI configuration. All invoices and payments for the trading partner will be listed under a single customer record in Accounts Receivable. - Multiple Customers with Single Ship-To Locations
An EDI Trading Partner can also be linked to multiple customer records with the customer determined by the Alternate Customer ID. This method would require individual payments in Accounts Receivable since a single payment cannot be applied to multiple customer invoices. - Multiple Customers, Multiple Ship-To Locations
The third method can be used for Trading Partners with Regional or Departmental Centers that process Invoices. The Acctivate Customer will be selected by the Ship-to Location ID on the EDI Purchase Order. Payments will be entered for each regional/departmental center (i.e., customer record).
Tax Info
This is the section where you assign the tax status of the customer. If they’re non-taxable, you can also enter the Tax Exemption information. For a full overview on setting up Sales Tax Codes, Items, and Groups, check out this article.
Phone
To setup the billing contact information, add the Phone, Fax, Email, etc. information on this tab. When no ship to specific contact exists, sales orders will default to this contact.
Misc
The Misc. tab has space for specifying whether or not you sync transactions as a different customer, setting default Invoice Text, or adding a customer pop up note.
- Synchronize transactions as: When a Customer ID is stored in this field, the currently open customer will not synchronize to Instead, all transactions (i.e. invoices, credits and payments) for the currently open customer will be linked to the customer’s’ record and synchronized to QuickBooks as that customer. This is useful for users that have the Web Store module and want to record every new customer that comes from their eCommerce website in Acctivate, but not synchronize the new customer records to QuickBooks.
- Invoice Text: This note will appear on invoices for the customer. Invoice Text is dynamic, customer specific text for an individual customer.
- Popup Note: This can be a general note or a note that will pop-up (only if the Popup checkbox is checked) when any record related to the customer is opened.
Notes
Users can create notes on the customer window. The notes can have a followup user defined (themselves or others) with a specific date/time. Check out this article on how to establish reminders.
Custom Tab
For anyone utilizing Custom Fields for Customers, the Custom Tab will show the data entered. This tab is only viewable when custom fields are defined for said window. To create custom fields, follow instructions listed out here.


