Vendor Bill Allocation to Inventory Cost


Through the Landed Cost module, Acctivate allows users to create a vendor bill and allocate the cost across posted inventory transactions. Landed cost allows a user to load items from multiple transactions and enter the vendor bill information, such as invoice date, vendor name, and total amount.
Landed cost can be generated from specific Inventory Receipts, all Receipts related to a Purchase Order(s), Assemblies, and Transfers. For example, you may receive a vendor bill for freight charges for a load that needs to be allocated over multiple receipts and/or transfers of product.
When needing to add other amounts or fees to a PO Invoice related to a purchase order, check out the training page for allocating other amounts listed on vendor bills.
Review Landed Cost Sessions
- Choose the Transactions list from the left navigation bar.
- Search for and locate the session or transaction types in question.
- Select session for review.
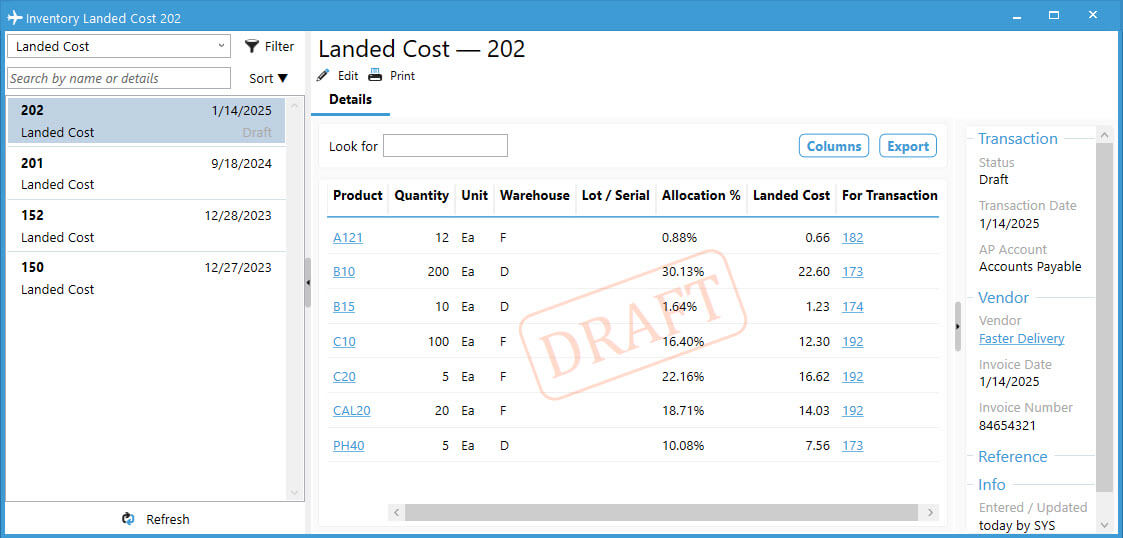
- Sessions saved, but not posted will show Draft on the list, as well as a watermark on the read only window for the transaction. These can be modified before posting by clicking the Edit button.
- Posted sessions will show more information, such as unit cost and amount allocated. If changes are needed after posting, you’ll need to void and recreate correctly.

Create Vendor Bill via Landed Cost
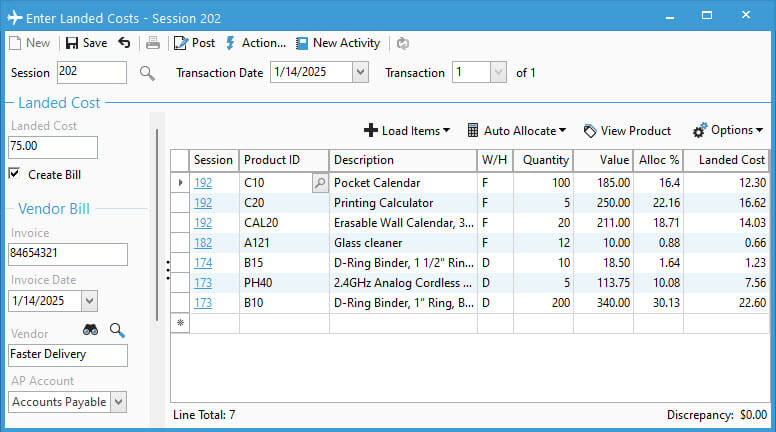
- Go to Inventory > Enter Landed Costs.
- Click New (Ctrl+N) on toolbar to create a new Landed Cost session.
- Enter Landed Cost amount.
- Enter the Invoice number listed on your Vendor’s Bill.
- Uncheck Create Bill if you do not want to create a bill in QuickBooks.
- Choose Invoice Date.
- Select Vendor from the look up.
- Click Load Items to select the associated inventory transactions to link the new Landed Cost. Users can load items by Receipt(s), Receipt(s) from PO, Inventory Transfer, and Inventory Assembly sessions.
- Continue loading items until all affected sessions are selected.
- You can add products to the transaction on the row marked with an *, but this will affect the entire warehouse value rather than a specific transaction.
- When doing this for lot / serial numbered items using Actual cost, you will need to select the specific lot / serial number.
- Click Auto Allocate to choose allocation method.
- Quantity: Allocation based on total quantity listed.
- Value: Allocation based on percentage of total value listed.
- Weight: A calculation based on the weight of the product listed on the Tech Specs times the quantity listed on the row.
- Volume: Similar to Weight, but uses the Volume field on the Tech Specs of the item.
- Users can modify the Alloc % and/or Landed Cost amount on each line manually. Make sure to allocate entire cost of the vendor bill to each row. You’ll see a Discrepancy amount in the bottom right corner in red text until all is allocated.
- Save session.
- When ready to complete, click Post.
- Once posted, users with proper access will be prompted to Preview, Print, or Cancel report printing. This report can be accessed at any time on the Transactions list and within the Reports menu.


