Vendors List


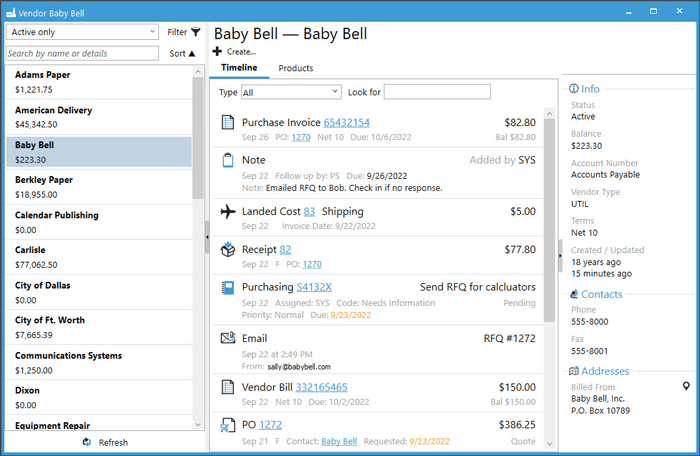
Quickly review your supplier list and their related transactions in Acctivate by utilizing the left navigation Vendors menu. The default Filter is set to Active only with the option to create customized filters to be saved for future use.
To begin a search, start typing in the Search by name or details field just below the selected filter. The lookup will begin performing a global search based on what you’re typing to give the best match as results.
For each vendor record shown as a match, the user can quickly see the vendor name in bold letters with their balance below. This balance reflects the balance from QuickBooks during the last sync.
Select the vendor you wish to review to see more details in the read only window to the right of the list. The Vendor ID and Name show above the Create button which allows users to create a related Purchase Order or Business Activity.
The main body of the ready only vendor screen shows the Timeline and Products tabs.
On the right-hand side, users can see Info, such as Status, Balance, Account Number, Vendor Type, Terms, and Creation/Updated Dates. Below the Info section, you can view Contact and Address information. The information shown is responsive based on whether the fields have values in the database.

Timeline Tab
The Timeline shows all linked activities related to the vendor. Users filter on specific types of activities by clicking the Type drown down menu. Additional filtering capability exists in the Look for box next to the Type filter. Begin typing some value to search the timeline for specific information. Acctivate will automatically start populating the data as you type.
Available Type Filters
- Business Activities linked to the selected vendor record.
- Landed Cost transactions both as an Other Amount on the purchase invoice and as a standalone session with the linked vendor.
- Notes and Emails related to or sent from the PO window.
- PO Invoices / Bills with the vendor listed. Purchase Invoices are created in Acctivate. Bills come from QuickBooks via the sync.
- Purchase Orders with the selected vendor record.
- Receipts related to purchases from this vendor.
While viewing the Timeline, moving the mouse over each activity prompts certain actions. Hovering over any activity created in Acctivate which has edit capabilities will show the pencil icon where the activity icon appears. For example, clicking this on a Note opens the related window for the user to modify any header details. Anything appearing to be a hyperlink will open the related read only window. For example, clicking a linked Purchase Invoice number opens the related read only screen.
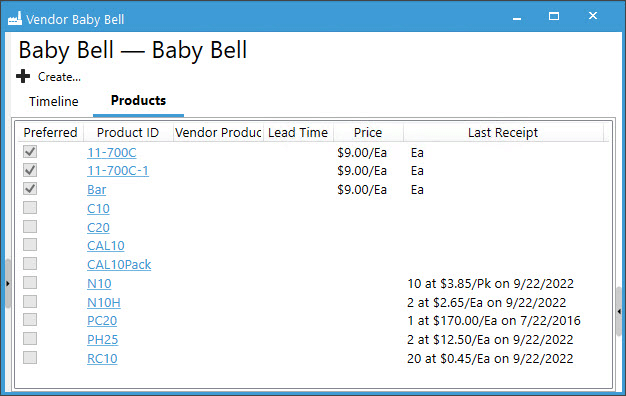
Products
To view the list of products assigned to the selected vendor, take a look at the Products tab. Easily see where the selected vendor is marked as a preferred vendor, the Acctivate product ID, the vendor product ID assigned to the item, lead time, price, and last receipt information. Clicking on the hyperlinked product ID opens the related read only product window for further review. To adjust the sort order, click the header you wish to sort to show ascending, descending, or no sort.


