Product Prices


There are several options for pricing in Acctivate. Contract, Customer Specific, Product Specific, and Product Categories are all various ways to setup any special pricing needs.
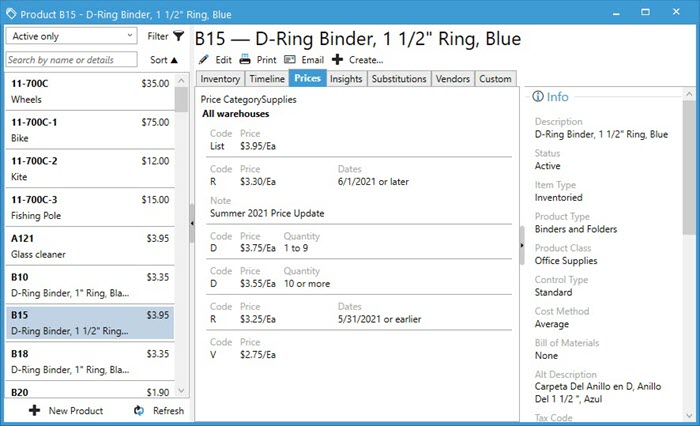
Special prices may be established for certain customers or groups of customers, as well as utilizing a list price. To view the price hierarchy, check out this article. This training page focuses on the List, Product Specific, and Price Category prices setup on the Edit Product window and Price Code Maintenance tool. These can be viewed from the Products list menu, as well.

List Price
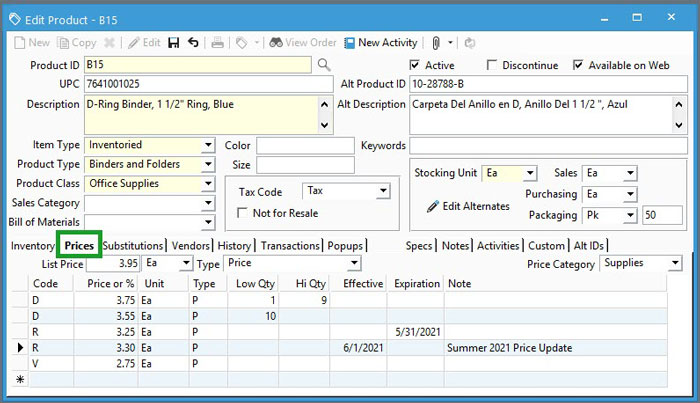
The List Price is typically the highest price you charge each customer or the MSRP. When no other price rules exist for the product, this price will default on the sales order window. Set this up in the Edit Product window on the Prices tab or import the data via the Product Import utility to ensure a default price exists.
Assign List Price to Product
- Navigate to the Edit Product window for the product in question and go into Edit mode.
- Clicking Edit from the Products list on a selected item will do this step for you.
- Select the Prices tab.
- Enter the desired value for List Price.
- Select the proper Unit. This is the unit of measure for the default price ($1.00/ea and $1.00/lb can mean two different things in Acctivate).
- Choose a Price Type. This tells Acctivate whether or not a calculation is required to set the price.
- P (Price): Sets the price to dollar amount listed in Price field. When using a straight price, there is no markup or down based on some other field.
- S$ (Management + Amount): Charges the management cost for the product plus the dollar amount listed in the Price or % field. The management cost is located on the inventory tab of the product for each warehouse. Customers typically use this when they want to manually adjust the pricing based on a marked-up cost. Posting a transaction does not affect this field.
- S% (Management + Percent): Same as S$ but utilizes the numerical percentage listed in the Price or % field rather than a dollar amount. Positive numbers add a percentage to the management cost and negative numbers subtract a percentage from the management cost. Make sure to enter percentages as whole numbers. When you want to add 50% to your management cost, enter 50 in the Price or % field.
- M$ (Last Cost + Amount): Sets price by using the last cost for the product and adds that dollar amount listed in the Price or % field. Positive numbers add a dollar amount to the last cost and negative numbers subtract from the last cost. Last cost is based on warehouse and is updated each time a receipt, assembly (finished good), or transfer (to the warehouse) is posted.
- M% (Last Cost + Percent): Same as M$ but utilizes the percentage listed in the Price or % field. Positive numbers add a percentage to the last cost and negative numbers subtract a percentage from the last cost. Make sure to enter percentages as whole numbers. When you want to add 50% to your last cost, enter 50 in the Price or % field.
- C$ (Average Cost + Amount): Charges the average cost for the product plus the dollar amount listed in the Price or % field. Average cost is the total value of a product divided by the quantity of the product and is available for inventoried products regardless of cost method.
- C% (Average Cost + Percent): Same as C$ but uses the numerical percentage listed in the Price or % field. When needing to mark up your average cost by 150%, enter 150 in the Price or % field.
- If only setting List Price, click Save. When entering the full set of Price Code prices, skip to step 3 in the Enter Pricing on Edit Product Window section below.
Price Codes
To set product specific prices related to the Price Codes assigned to customers, configure the codes beforehand in Configuration Management. Once configured, products can be assigned to them via the Edit Product window on the Prices tab, Product Prices import, or in the Maintain Price Code Utility. These are selected on sales orders when no customer specific pricing exists, but the customer is assigned to a price code related to a matching price code price on the product. When entering these, the users have additional options for price type on top of the list price options above:
- L$ (List Price + Amount): Charges the list price for the product plus the dollar amount listed in the Price or % field.
- L% (List Price – Percent): Starts with the list price for the product and subtracts a numerical percentage listed in the Price or % field. When needing to mark up on list, enter the percentage as a negative number (i.e., adding 50% would be a value of -50).
To enter the price code pricing manually in Acctivate, users may enter them by product on the Edit Product window or by price code in the Price Code Maintenance tool. The steps for both are listed below. See this article for specifics on how to use the Product Prices import utility to enter pricing.
Enter Pricing on Edit Product Window
- Navigate to the Edit Product window for the product in question and go into Edit.
- Clicking Edit from the Products list on a selected item will do this step for you.
- Select the Prices.
- On the row marked with an *, select the Price Code to add to the product.
- Enter the Price or % – see above explanations of price types for examples of what values to enter.
- Select the Unit related to this price.
- Choose a Type from the drop down.
- Assign any low/high quantities or effective/expiration dates as needed. See below explanation on how to enter multiple levels of each.
- Repeat steps 3-7 for each new price code price.
- Save the changes.

Assign Products to Price Codes via Price Code Maintenance
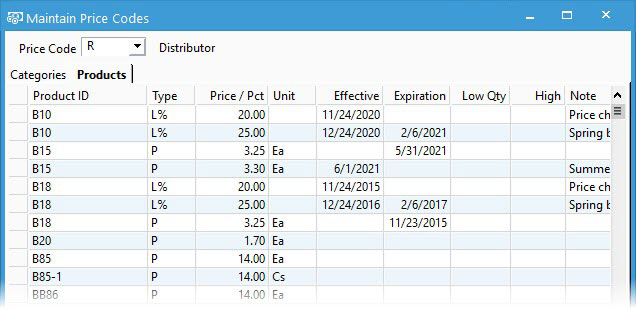
- Go to Inventory > Price Code Maintenance.
- Select the Price Code.
- Click on the Products.
- On the row marked with an *, type the Product ID and tab to select or use the lookup to search and find.
- Choose the product.
- Enter Price / Pct value – see above explanations of price types for examples of what values to enter.
- Select a Unit.
- Assign any low/high quantities or effective/expiration dates as needed. See below explanation on how to enter multiple levels of each.
- Repeat for steps 4-8 for each new product assignment on the selected price code. If adding pricing to multiple price codes, start at step 2.

Setting Quantity Breaks or Effective and End Dates
When setting up quantity breaks, enter the Low Qty as the first number you wish to make this price available. This sets the threshold for the beginning of the quantity breaks (i.e., list price until they order 5 which would be entered as the low qty). If you want to add multiple levels, make sure to also enter the High Qty as the last number available for this price. Keep in mind, this would be 9 when the next level begins at 10. Continue adding the same price code to the list of prices with each level until the list is complete. The last level of pricing can have a blank High Quantity to tell Acctivate to use this price for any quantity listed over the Low Qty specified on the row.
To enter pricing with effective and expiration dates, type them in the named fields. Add the price code for each new timeframe. The screen shot above shows R prices with effective and expiration dates. The second R price goes into effect 6/1/2021 and does not expire. If an expiration date of 8/31/21 existed on this row, R prices would expire and default to List Price without any additional pricing setup after the end of August 2021.
Price Category
Products may be priced by a Price Category that is shared with a group of other products. In this shared pricing model, a common set of prices may be established for a Price Category. This category can be assigned and utilized as a customer specific price group or as a generic product group price. The latter is the last check before selecting list price while entering a sales order. To create and assign new price categories, the user can either run the product import utility (Product ID and Price Category as the columns in the sheet) or type the value on the Edit Product window > Prices tab. Once created, the price category needs to be assigned to the products within the group and prices setup in the price code maintenance utility. Price Categories do not require additional steps in configuration management.
Manually Enter Price Category on Edit Product Window
- Navigate to the Edit Product window for the product in question and go into Edit.
- Clicking Edit from the Products list on a selected item will do this step for you.
- Select the Prices tab.
- Either choose a Price Category from the list or type a new value into the field.
- Click Save.
- Repeat for each product needing to be assigned to this category.
Assign Pricing to Price Categories in Price Code Maintenance
- Go to Inventory > Price Code Maintenance.
- Select the Price Code.
- Click on the Categories.
- On the row marked with an *, select the Price Category.
- Choose the proper price.
- Enter Price / Pct value – see above explanations of price types for examples of what values to enter.
- Select a Unit if all in category share the same unit of measure. This option is not always available.
- Assign any low/high quantities or effective/expiration dates as needed. See above explanation on how to enter multiple levels of each.
- Repeat for steps 4-8 for each new price category assignment on the selected price code. If creating pricing for multiple categories, start at step 2.
- Close the window when finished.


